Showing posts with label Tessuti. Show all posts

Sunday, 30 December 2018

Made in 2018 (Warning: long post!)

Hello to those still following this blog! I haven't blogged since 1 January 2018, so it's probably about time I posted a round-up of my 2018 handmades.
It's a long post! So here's a summary for those after a quick fix: 
2018 was a year of boxy tops and dresses, ruffles (sleeve, back and bum!), and lovely linen fabrics. I had success with a new pants pattern but the second half of the year focused on maternity friendly dresses. Hoping to get back to sewing pants late 2019. Below are some very glamorous selfies taken in the spare bedroom, work toilets and foyer. Enjoy!

1. In Progress...
In addition to a couple of unfinished dresses I'm hoping to get to before the end of summer, we're expecting our first baby due in March 2019! All is well with both baby and I. I haven't been sewing any maternity clothes per se but my love for tent dresses has really come in handy.

2. Black Feather Viscose Tessuti Lois Dress
This Lois Dress was a follow up from my wearable muslin - details here.  I prefer my first version which got a lot of wear last summer. But this black version has been a great option this summer as the floaty skirt still fits over my baby bump and is less sheer than the white version.


3.  Pineapple Ruffle Sleeve Noelle Top
I get so much wear out of my navy spotty ruffle sleeve top made late last year - another version was a no-brainer. I made both tops from a slightly modified version of the Ulooop Noelle top pattern, but those ruffle sleeves are a simple addition to any boxy top pattern. 


This version was meant to be a casual summer vibe -  but I wonder if it's actually pyjama resort wear?


4. Double Weave Linen Cotton Gingham Dress
This dress is another modified version of the Ulooop Noelle top pattern


Modifications include: cut width from the Centre front (see previous ruffle sleeve tops for details), sliced the back piece below the underarm for a ruffle back (details in ruffle top version), and lengthened for a mini dress. 


I found the double weave linen cotton blend (bought from The Cloth Shop) too heavy for me, but the dress found a new home with a good friend, and it has since received the love and wear it deserves.


5. 2* Butterick 6182 Box Top
My first Butterick 6182 is a copycat from a display at The Cloth Shop in Ivanhoe. After months of eyeballing the fabric pattern combo I made my very own out of this beautiful cotton soon after to be followed by a navy linen/cotton blend.


I followed the pattern as standard - no changes necessary. The sleeve bands and front darts make this pattern a little more interesting and well fitted compared to other boxy tops I've sewn.


I've gotten a lot of wear out of these tops and thankfully they also work well with maternity skirts etc. I particularly love the navy version which has a nice drape.


6. Linen Tessuti Lisa Dress
I made this Tessuti Lisa Dress early 2018 and it got some good wear at the time. But it's been a godsend this past month or two as the weather heats up. There is so much room in the skirt that you almost can't tell I'm pregnant which is a nice change.  


I think the buttons may be cut just low enough to also work as a nursing dress without any modifications. Otherwise, I could lower the curved bodice/skirt seam a little and add an extra button for a great nursing dress/top. 


The pattern comes together well with lovely neat insides. I made the size small. Personally, I think the armscye is a little big with the underarms cut too low. On me, you can spot the side of my bra.  But, that's allowed for more bust room which is helpful at the moment. This version is made from a green/white chambray waxed linen from The Cloth Shop. I will definitely be making this one again.


 7. Black Linen Megan Nielsen Flint Pants
Not much to say as these are my fourth pair of the Megan Nielsen Flint Pants/Shorts. Details on previous versions here


As done previously, I've removed the front box pleat and added a double side button rather than one bigger button. I find the double button to be more secure and keeps the waistband from folding down.


 I LOVE this pattern and look forward to squeezing back into my Flints.


8. Denim Persephone Sailor Pants 
The Anna Allen Persephone Sailor Pants & Shorts were my first foray into sewing Jeans and a button fly. To sum up - I think this is a great first jeans pattern for those starting out!


The covered button fly means you can have some fun with your buttons rather than using metal jeans buttons. I went with plastic white and navy striped buttons on the covered fly and a navy sailor button at the waist. Next year I need to conquer metal buttons and hardware. 


I used non-stretch denim and found the fit pretty good but not super comfortable when sitting. Next year I'd be keen to sew up a black stretch denim pair.  


9. In the Folds Peplum Dress
If you haven't already checked out the free In the Folds patterns available on Peppermint Sewing School - Stop and do so immediately! There are a handful of fantastic patterns available, including the Peplum Top. I've sewn the top up twice before - both getting a lot of wear. Given how high the peplum starts the top is maternity friendly if you extend the peplum length. 

I made a dress version out of some gingham linen (also from The Cloth Shop) to get me through a big-bellied summer. I intended to make a size up for a little more bust room - but accidentally went up two sizes making the dress a little too big. But it works for a comfy summer dress and I'm keen to make another slightly smaller version. 

10. Burnt Orange Bum Ruffle Dress
By far my favourite make of 2018! This dress is the very popular Vogue 9237 Back Bum Ruffle Dress sewn in a vibrant medium weight burnt orange linen (Yep - fromt The Cloth Shop). The fabric easily transitions from winter to summer outfits - but I actually prefer it layered up with winter tights, boots and cardigans.


 Ruffles, Pockets, Maternity friendly - what's not to love?


Well actually the armsyce and neckline are way too high and restrictive, but both are an easy fix. I took around 1/2" from the neckline and the underarm. I have summer version in progress in a lighter fabric.


Thanks to those who made it through this giant photo dump. I'm not sure how often I'll blog next year. I mainly use instagram to follow along with the online sewing universe. Hope to see you there!

Happy New Year!

Monday, 1 January 2018

Tessuti: Spotty Alice Top

The Tessuti Alice Top pattern is one on my most sewn and worn items.  I previously sewn two for myself (V1, V2), and the first version I made in 2014 is still on high wardrobe rotation! I've also sewn two for some special women in my life (V3, V4). I know I'll continue to sew and wear this pattern for years to come!


This Alice is made from a transparent white and black polka dot cheese cloth fabric recycled from summer maxi dress a friend gave me.  It's wonderful when friends and family see potential in an old piece of clothing and generously donate the fabric to me.


I lined the upper bodice in off-white cotton I had on hand. I added an extra  few inches of width to the lower bodice front and back in the hopes that the extra fabric would reduce its transparency. No luck, so I typically wear the top over a cami.  I like the look of my Alice tops tucked loosely into my jeans or shorts. The fabric stays lovely and flowy (so I can eat all the things!), but I find the cinched in look a bit less overwhelming. 


I've been reaching for this top a lot this summer! Note, when berry picking the Alice top does not provide adequate coverage to avoid sunburn or thorns.

Tessuti Lois Dress: Very Wearable Muslin

Tessuti released some great patterns in 2017! I was most facinated by the Lois Dress. Lois has a low cut front, is midi length and skims over the stomach and hips. All beautiful features, but ones I would normally avoid for myself. This is a dress I would walk straight past when shopping thinking it wouldn't suit my shape. It turns out I'm more adventourous when sewing my clothes compared to buying, and I'm really glad about that! 


For my first attempt I used a cotton fabric, white with black squares, from my stash. I cut a size 10 with size 8 shoulders. I followed the intructions with some very minor deviations: I stay-stiched rather than using tear away vilene around the neckline and waist, and I cut and sewed the darts in one piece (as ususal) rather than as the pattern / instructions detail. I dont think either vilene or the alternative darts are nessecary.  
                

The dress comes together reasonably quickly and the instructions a great! Lots of detailed photos to take you through each step. The most fiddlly aspect was joing the top to the bodice at the centre front. It's tricky (but doable) to get a nice point at the neckline, and worth taking the time to get it right. I love the 3-step process for attaching the bias binding, which creates a really firm and neat neckline. I was worried about the low-cut neckline, but the plunge stops just above my bra bridge. Perfect!


As usual for Tessuti patterns, the number of pages to be printed is execcesive!  The pattern could definitely be repositioned to spread across fewer pages. It would also be useful if a legend was included stating which pages need to be printed for what pattern pieces. This way I could have avoided printing pages for the vilene shields and the bias binidng piece - niether of which are nessecary, IMO. This would also be useful if you need to reprint a pattern piece gone missing, or go up a size only in the bodice pieces, for example. 


Overall, I really like this pattern and am pleasantly suprised at just how flattering it is on me, and on women of varying shapes and sizes across the sewing blogger community. This dress was intended to be a muslin, but I've already worn it a heap! I've also sewn another version in a darker viscose. Looking forward to seeing what patterns Tessuti release in 2018.


Sunday, 24 September 2017

Party Gabby Dress

Hello again so soon! It was my little sister's 21st birthday this week and I wanted a new party dress for the occasion. A quick and easy silk Tessuti Gabby Dress did the trick!


I initially cut a straight size small (short length) out of some lovely patterned crepe silk bought from a fabric sale at Phillips Shirts. Pre-hemming I tried on the dress and found it a little too short. I rummaged through my fabric stash for some inspiration on how to add length. I wasn't convinced by a straight contrast hem panel (View A) - a ruffle is much more party-like! 


The ruffle is made from a spotty black textured silk from The Cloth Shop. I was saving it for a summer blouse - hopefully, I still have enough for that project. The gathered ruffle is 2.5" after attaching and hemming. During sewing I worried the ruffle might look like an afterthought and a bit too 'crafty',  but I think it actually makes the dress. 


I've made the Gabby twice before (12). I've worn my rayon floral version to death and quite a few times since holes started appearing at the seams. I'm glad to have a new version I know will get heaps of wear winter through summer.  The shape may not be the most flattering on me, but it's so comfortable! And, I think the Gabby looks great cinched in with a belt too.

Tuesday, 25 April 2017

Sparkly 2015 Frocktails Dress

In August 2015 I attended the famed Melbourne Frocktails event organized by Kat. It was about that time that I fell off the sewing/blogging wagon and I never got around to blogging my dress. So here goes. My frocktails dress was definitely not a priority the months, weeks, or even days leading up to the event. I was, however, very excited about catching up with all the lovely sewers attending.


I considered all of my patterns carefully and sorted through fabrics for inspiration.In the end, I decided to make a quick and nasty Tessuti Gabby dress and hide behind the sparkle! I made a size small, as my medium version is on the big side. I sewed a lining and a sequin outer and joined them at the neckline. The lining is a terrible black poly satin that felt awfully hot to wear, even on a cold winter's night. The outer was a black mini sequin. Both fabrics were from GJ's discount fabrics. I inserted a back slit neckline closure and hemmed the outer fabric with black bias tape.


This dress was very fun to wear on the night. But it is hot and heavy to wear. I haven't worn the dress since. But I'll keep it in the wardrobe - you never know when a black mini sparkly number will be called for.


Friday, 21 April 2017

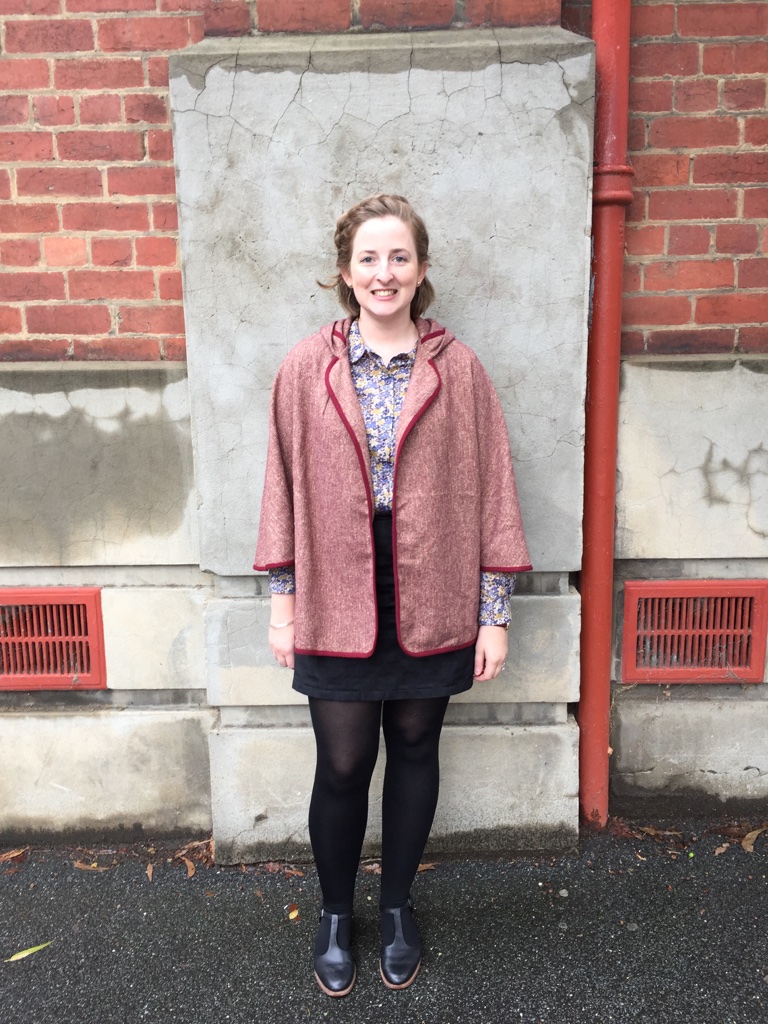
Tessuti New York Cape

Hello again my blogging friends! It's been almost 12 months since my last blog post. As the old saying goes, "how time flies when you're... finishing a PhD". I've sewn a few bits and pieces in the past year, but I finally feel motivated to blog again. This renewed energy is partly inspired by a good friend Jess who has just launched a fantastic blog spotlighting women who cook, create and curate food for a living. I definitely reccomend a look - especially if you're a local (Melbourne, Aus).

Ok, onto my lovely Tessuti New York cape. I bought this pattern and cut out my fabric close to three years ago. It then sat unsewn until I picked it up earlier this month. I was intrigued but not absolutely in love with my fabric choice - hence the delay. But I'm really happy with how it's turned out.

The pattern instructions were detailed and the pattern surprisingly simple to put together. The only change I made was to cut an 1" from the bottom of the cape. Given the lack of shaping, I felt a slightly shorter cape was best for my height and proportions. The pattern was a pleasure to sew and I'd definitely make another in grey/black shades.

To brighten up the insides I used a navy floral tana lawn bought from Spotlight to bind the seams. External edges were bound with a luscious wool binding from Tessuti. This stuff is pricey but worth it. I don't think any other binding would work as well for this pattern. I machined sewed on the wool binding. Other bloggers (1, 2)have recommended hand sewing. I'm sure this would have prevented the slight tension puckering I'm getting in the front of the cape. But it's not bothering me enough to fix it. Another good steam might resolve the issue.

My cape currently lacks buttons. After traipsing around the city and trying to convince myself that several different buttons look "fine", I've decided to just go without. At least temporarily, until the perfect button finds me! In the meantime, I've tacked the undersleeve together. I'm not sure I'd wear the cape closed very often anyway as it's a fairly lightweight coat.

Thanks for reading. It's great to be back! 

Tuesday, 3 May 2016

A Belated Tessuti Sydney Jacket

A post that's been half written since last winter:
I love the Tessuti aesthetic. The designs are modern, minimalist and often offer comfort through oversized, boxy or flowy styles. There are a few bloggers on my feed who make just about all Tessuti patterns and they look stunning wearing them. I'm not so sure about these boxy, flowy, often lengthened garments on my body. I generally admire these patterns on others and avoid them for myself.


This was true of the Sydney Jacket initially. And then these amazing coats kept popping up all over my blog feed. I went to a Frocktails fabric shopping get-together last year and I saw four different ladies in four equally gorgeous coats in one morning! About an hour in to the day I was convinced I'd give it a go.

I bought my fabric (wool/poly blend) from The Fabric Store and cut a size S. Due to fabric wanting to fray a little I excluded the exposed pockets and cut the front piece along the selvage. I didn't both about pattern matching because the pattern is a little origami like at first and I didn't want to stuff around figuring out the perfect match only to get it wrong. Especially as I wasn't convinced I'd even wear the coat.

The sewing was pretty darn quick. I found it helpful to mark in chalk the overlapped seam lines on the fabric when lining up pattern pieces. I really like the look of the exposed seam lines but they can get a little messy if you're not careful. On the edges of the coat I sew a line of stitching parallel to the raw edges and then purposeless frayed the edges a little.

These photos are from last winter, wearing the coat over Jeans. But since, I've been more likley to wear it over another drapey long sleeve cardigan with a fitted skirt. I wouldn't say I feel totally myself in it and I think I look a bit like I'm just wearing a blanket, but it's very warm and comfortable. I've been considering making another version but can't decide between a colourful tartan I've been dyeing to cut into and a basic black or tan.  I wonder also if a slightly thicker fabric would give it more structure and remove some of the blanket look?

Saturday, 5 March 2016

Cropped Tate Top & A Break

First up, a favourite new top. A cropped version of the Workroom Social Tate Top. This is a free pattern which I've made (and reviewed before) as top, a lined silk dress and a teaching top for my little sister. It's a great basic modern top pattern.

I thought a cropped version would look amazing in some black voile eyelet from Tessuti. But, the cropped pattern includes a slightly curved hem at the back and an angled hem at the front, which would mean cutting into the beautiful scalloped edge of the eyelet fabric. Instead, I straightened out the hem line in order to incorporate the scallop and made the hem line even to the longest point of the top. Otherwise, I cut a standard size 8.
As I was using eyelet fabric I decided to line the fabric in some black crepe poly I had on hand. I cut the lining bodice about half an inch shorter than the main fabric so that, after hemming, it wouldn't be visible in the lower scalloped edges.
I followed the steps I used when making a lined Tate Dress. I sewed the darts and shoulder seams on the twop tops separately; sewed them together at the neck and arms; turned the tops right way out and then sewed the side seams, centre back, and lining hem. Again, I used a hook and eye in preference to a zip.
I love how this top turned out and a have warn it quite a few times. Before this version, I began sewing and abandoned a lovely lawn cropped version from fear of it showing too much stomach. I will definitely use this straightened out longer cropped hem for future versions.
Now, to my sewing/blogging hiatus. Before I started sewing I shopped. A lot. I would buy a new garment/item probably every week or two. In 2014, I was so excited by my advancing sewing skills and the ability to make the exact garment in my head for any particular occasion or just for fun. I averaged 2 garments sewn per week, sewing late into every evening. There was little need to shop anymore. As well loving learning a new skill, sewing was also an outlet during a rough patch in my PhD (the inevitable "why am I doing this?" stage).
From about mid-year last year my sewing slowed up. I since sew around once a month and blog less than that. I'm still an avid reader of sewing blog posts and take great pleasure in looking through my fabric stash, but I rarely feel the pull to sew. I haven't reverted back to weekly shoping trips. While I still love shopping, I don't like buying things I know I can make and I also just feel less need to have a new outfit every other week. I sew when I need a specific garment for an occasion. I'm not too sure why my sewing has slowed up so much but I still get so much joy from my occasional making. I'm not going to question it, just sew when I feel like sewing. In the mean time I'll probably blog few items I never got around to.