Saturday 28 June 2014

Grainline Studio: Archer Shirt & Moss Skirt

I had very good intentions about entering The Monthly Stitch's Indie Sewing Pattern Month weekly competitions. Alas, it's the last weekly challenge and this is my only entry for the month. I recently bought Jen's Archer Shirt PDF pattern and was quick to put it together and get started on it. I decided it would look great paired with a Red Moss Mini and I should enter in it the Fangirl Competition: and outfit made from two or more garments from one indie sewing pattern company. I'm definitely a fangirl of Grainline Studio!


For my first version of the Archer shirt I made version A: a simple button down shirt. I cut a size 6 out of lovely cotton I've had in the stash for an age. It's lightweight, but not sheer, with a white and dark navy polkadot and flower pattern.


The shirt itself is beautifully drafted and came together very well. I began sewing the shirt by following the pattern instructions only. The instructions are lengthy but I found a few minor details missing. I've never sewn a button down shirt before so I wanted to take it slow and get all the details right. I went to the sewalong for more details. Again, some minor details were missing but in most cases the photos helped me figure out the necessary steps.


Other than the tedious button holes I found the shirt came together muck quicker than expected (around 1 days sewing). I think the final product look pretty professional, except for where the pattern mismatches. I didn't make any effort to pattern match this first version, but it looks no worse than many store bought shirts.

The shirt is quite boxy and maybe ever so slightly too roomy in the back. The shirt will be worn tucked in mostly thought so the excess fabric wont be noticeable. For future versions I might play with narrowing the shoulder a bit and lengthening the arm, but other than that I'm pretty happy with the fit. The shirt looks fab tucked into my newest Moss Skirt. I've made the Moss Skirt 5 times before and my denim moss remains one of the most worn items in my wardrobe (handmade or store bought). I can now sew up a Moss in an easy afternoon.


For this version, I was very inspired my Andrea's moss and archer outfit. I was desperate to find a fire engine red twill, heavy drill or wool. I searched and searched and found very little red at any of my usual fabirc haunts. In the end I settled for this striking tweed wool at Rathdown Remnants. Bright red and white wool are woven together so that it looks orange.


I cut a size 10 (my usual) and made no adjustment to the pattern other than to increase the length of the skirt by 2". Even with the added length this is a mini skirt for me.  For the facings and pockets I used the left over linen rayon blend from my Butchered Orange Iris Shorts. Talk about a perfect match! I overlocked all the insides with white thread.


Interestingly the fit of this moss is a little off. I find it ever so slightly too tight and hate that you can see the pockets outlined in the front. In hindsight, I wish I had of sewn the side seams 1/4" rather than 1/2"and also lined skirt. Without a doubt I will sew more Archers Shirts and Moss Skirts. I also look forward to trying more Grainline Studio patterns (especially the soon to be released shirt dress!). 


Above is a photo of how I actually wore the skirt and shirt out shopping with Tim. I felt a little self conscious in my very bright skirt at first, but I'm now fully in love with it!

Friday 27 June 2014

Sewaholic Cambie Dress: A Wearable Muslin

I bought the Sewaholic Cambie Dress from Indie Stitches late last year with great plans for a 'conference Cambie'. Clearly I got a little distracted. Also a really long time ago, I promised my little sister I'd make her a dress of her choosing out of some elephant fabric she'd bought. She chose the Cambie! Well, I wasn't about to give her the first version I made up. I needed to have a practice run to make sure hers was perfect. This version acts as a practice run for Gen's dress as well as a wearable muslin for my future Cambie's.

Sewaholic Cambie Dress

For this dress I made version B (full skirt) in a size 8. I'm pear shaped so I can cut a straight size when using Sewaholic patterns - fantastic! I made no adjustments to the pattern other than to use the width of the folded over fabric for my skirt pieces as it was slightly narrower than the pattern pieces. Hard to believe my skirt could be poofier!

Sewaholic Cambie Dress

My fabric is a a floral lightweight cotton  which I also have in the pink colour way (see Gerties Bow Tied Blouse). This dress is fully lined in white cotton lawn.

Sewaholic Cambie Dress

 I had so much more fun sewing this dress than I antitcipated. There are just so many pieces that I thought it might be a tricky make. But, It really wasn't! Tasia's instructions are spot on. I didn't even need to reference the online sew-along. Simply put, the garment construction just involves making the dress shell, the dress lining and then sewing them together inside out. Gen's dress will be a version A (a-line skirt) and unlined, as she chose a thick fabric, so I imagine her dress will be an even easier make.

Sewaholic Cambie Dress

When I tried on the almost finished dress I could see that the straps would need to be adjusted, but I didn't realise by how much! I ended up removing 3/8" from both the front and back shoulder as well as easing the front sleeve in a further 6/8". Thus, I removed a whopping 1.5" from the sleeve. The finished dress is much improved but some fabric could be removed from the centre front and I also find the bodice a little too long. For my own future versions and Gen's dress I will remove 1/2" from the bodice length.

Sewaholic Cambie Dress

I love this Cambie. It feels super girly with the lined poofy skirt and it totally fits into my preferred fit and flare style. I'm sure I'll get a heap of wear from it in spring. Anyone in Melbourne will know that its too damn cold to be wearing this very springy dress in the middle of winter. So I layered it up with tights, my pink Coppelia Wrap Cardy, another store bought Cardy, a scarf plus my jacket for outside. 

Sewaholic Cambie Dress

Unfortunately, as you can see, these are more indoor shots. I tried to patiently wait for weekend photo opportunities with some of my other makes but I like to wear them as soon as I've made them and then they end up in the washing basket before I get the chance to take photos. The above photos I took in our living area. My sewing room gets better light during the day. But photos in my sewing room are filled with a back drop of WIP's and carpet littered with thread. Bring on Spring/summer!

Sewaholic Cambie Dress

Tuesday 24 June 2014

Outfitted In Knits: Moneta & Coppelia

When Colette Patterns released new knit patterns I thought they were lovely, but not for me. I have the Teach Me Fashion Draped Skirt (see here) which is easily modifiable, so no need for Mabel. The Moneta is a pretty, gathered skirt and fitted bodice, knit dress with some really cute collar options. I didn't jump on it either. I don't find knit dresses flattering on me (also the reason I haven't bought any other knit dress patterns). But the blogging world wore me down. There are only so many amazing Moneta's on women of all different shapes and sizes you can see before you have to give it a go, no?  I gave in and bought Moneta (and the Negroni shirt, eek!) from Indie Stitches.

Moneta Dress Coppelia Cardy

I bought this blush pink striped Alannah Hill knit from Clear it last week. It is beautiful, but I got it cheap and it's probably a bit pale for me so I was happy to use it for my first Moneta. For my first attempt I decided on Version 1 (lined) but without the pretty collar. The fabric recommendation for the main fabric is 2.5m, but I only bought 1m. It was a very tight squeeze and I had to include a centre back seam in the skirt. But, I made it fit! 

Moneta Dress

The fabric is sheer and very lightweight so lining was a must. I used cream cotton knit. Unfortunately I only had enough to line the bodice. The instruction booklet only explains how to join the bodice to the lining at the neckline for the collared version. Instead, I just sandwiched the two bodice pieces right sides facing and serged around the neckline, turned right sides out and pressed.

Moneta Dress

The instructions for sewing the lining and shell together at the arm holes were different to anything I've ever done before. Because of this I found them a little confusing. Thankfully Colette Patterns have a helpful video tutorial showing the steps clearly. It is a fiddly technique but works fine.

Moneta Dress

I cut a size small grading out to a medium at the waist. I made no fit adjustments on this version. I think the fit is ok. There is some draping at the centre front neckline which I could fold out of the pattern for any future version.While the fit is ok, I don't feel great in this version of Moneta. I will have to make another version in a thicker knit before I rule knit dress out of my wardrobe forever-more. 

Moneta Dress Coppelia Cardy

I recently set aside some sheer black knit for another Papercut patterns Coppelia Cardy. I thought the black wrap cardy would be the perfect accompaniment for Moneta during the winter months. I made this Coppelia exactly the same as my first, except that I cut a straight XS. The fabric is silky soft. Flattering or not, this outfit is darn comfy!

Moneta Dress Coppelia Cardy

I'm really happy with my investment in the slightly more expensive Papercut Patterns. Of the three patterns I own, I've made them all multiple times. The Coppelia and Ensis are great basic knit shapes and their patterns feel really 'me'. I will definitely be buying more and look forward to future pattern releases.

Moneta Dress Coppelia Cardy

Friday 20 June 2014

Victory Patterns Chloe Dress

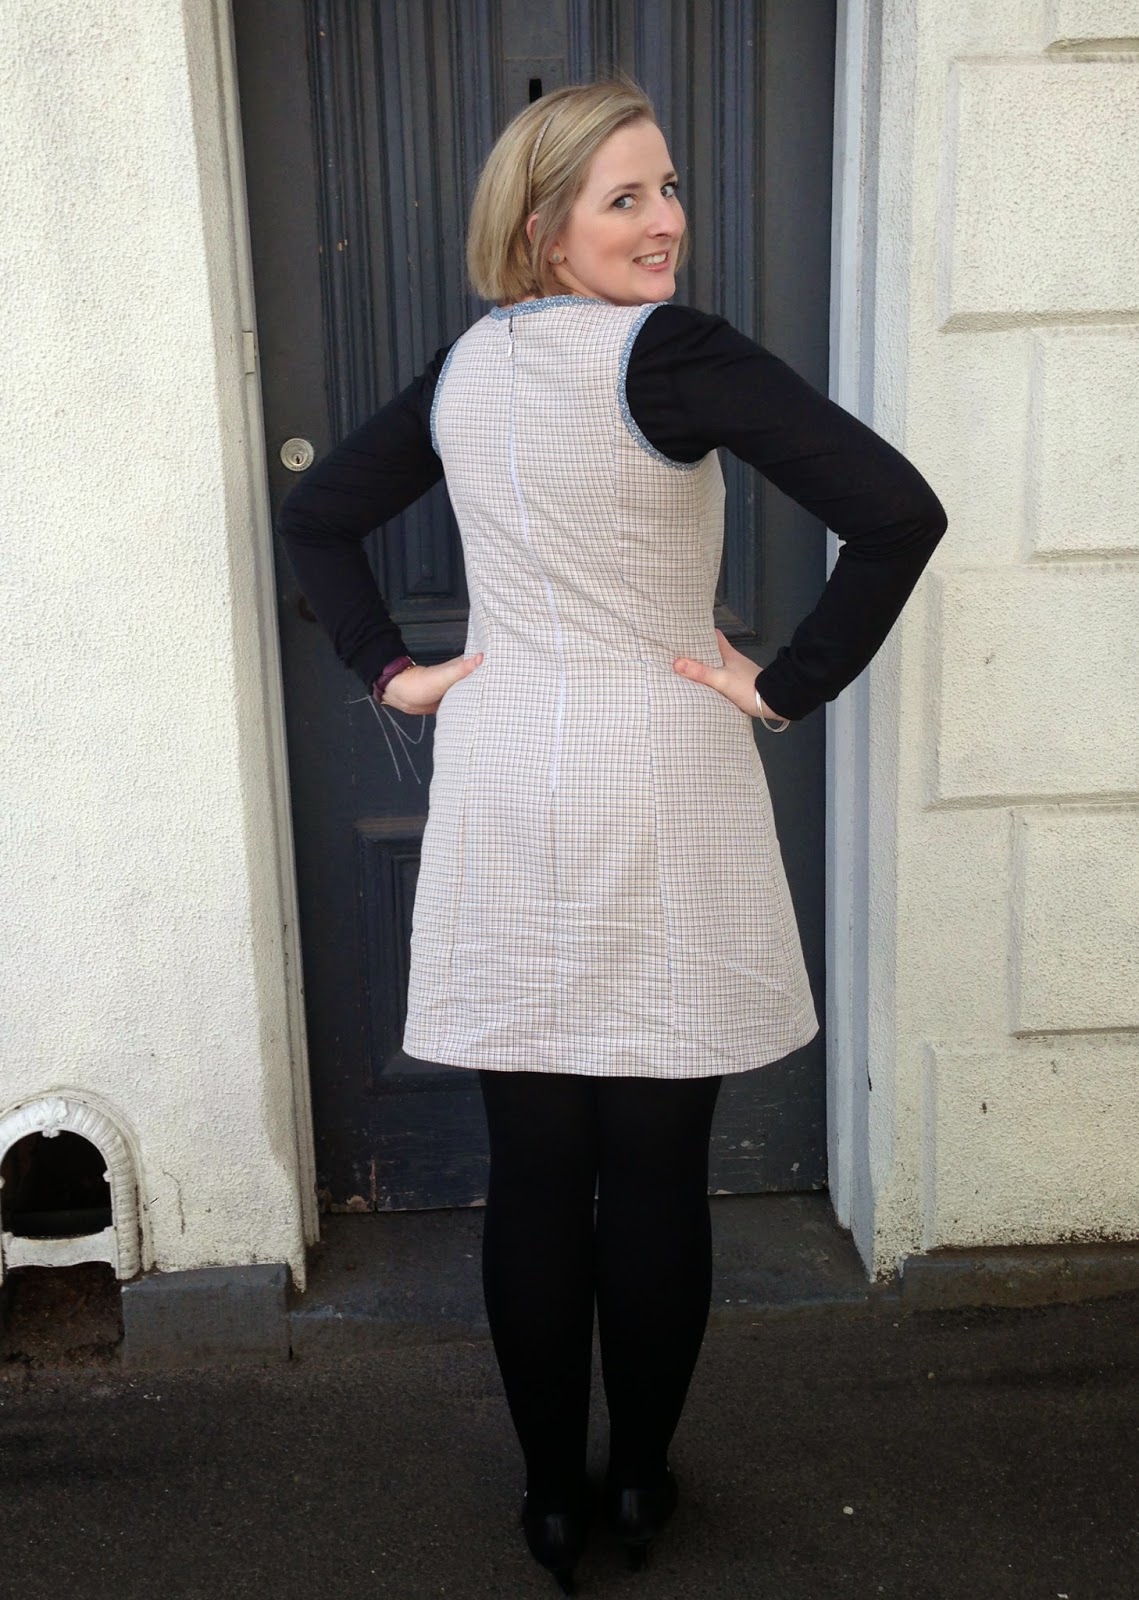
I bought the Chloe Dress from Indie Stitches so long ago. I even bought fabric for it and traced out the pieces months ago. Finally, Chloe is finished and she was well worth the wait, imo. Chloe is a princess seamed shift dress with front welt pockets and options for lining and cap sleeves.

Victory Chloe Dress
 
I made version 1 (sleeveless and lined) in a size 6 from the shoulder/chest grading to a size 10 from the waist down. The original fabric I bought for the dress is a cream, yellow, pink and blue plaid tweed wool from The Fabrics Store. it was on sale for $6 so I bought 3 metres. I love it and there is a heap left. I might see a matching jacket in my future. Unfortunately the plaid photographed a little strangely - sorry!

Victory Chloe Dress


For the lining I thought that the left over mustard from my Ava jacket would work perfectly. Unfortunately I didn't have quite as much left as I thought so I used the mustard for the back and leftovers from my Belcara blouse for the front. For the neckline, sleeves and pocket trimmings I used some blue and white floral scraps. This was a gamble, do plaid and floral go together? Tim suggested the left blue wool from my latest Betsy instead. I decided  to risk the floral and I actually really like it. I think the trim makes the dress abit more casual, which I like.

Victory Chloe Dress

I used the instructions only as a guide. If you want to be hand held through the sewing you might find them lacking. For example there was no suggestions of when and what seams you might like to finish along the way.

Victory Chloe Dress

I inserted the lining and zipper a little differently than suggested. I made the dress shell and the dress lining completely, sandwiched and basted them together, and then treated them as one when adding the zipper and trims. This worked perfectly. I still have to add a dress hook at the top but I couldn't wait to wear it.

Victory Chloe Dress

I love how the dress turned out. The front is a little roomy around the stomach area but the back is perfect and I think it looks great.  This is a winter version but I think it will look good without the longsleeves and tights in spring as well. I will definitely make more Chloe's! A few unlined cotton shifts will be great for summer work dresses.  I'll see if I use the front pockets, but if not I might exclude them in the future (shock horror!). I think they are super cute, but they bulge and make me feel like I'm storing a baby kangaroo in there.

Victory Chloe Dress

Thursday 19 June 2014

Simplicity 1419 Round Trip Dress: A Wearable Muslin

Earlier in the month I posted about my Simplicity 1419 Round Trip Jacket. I like the look of the dress included in this pattern just as much as the jacket and have plans to make one from some beautiful Japanese cotton from Tessuti. But first, I decided to make a wearable muslin dress out of some fabric scraps to check the fit.

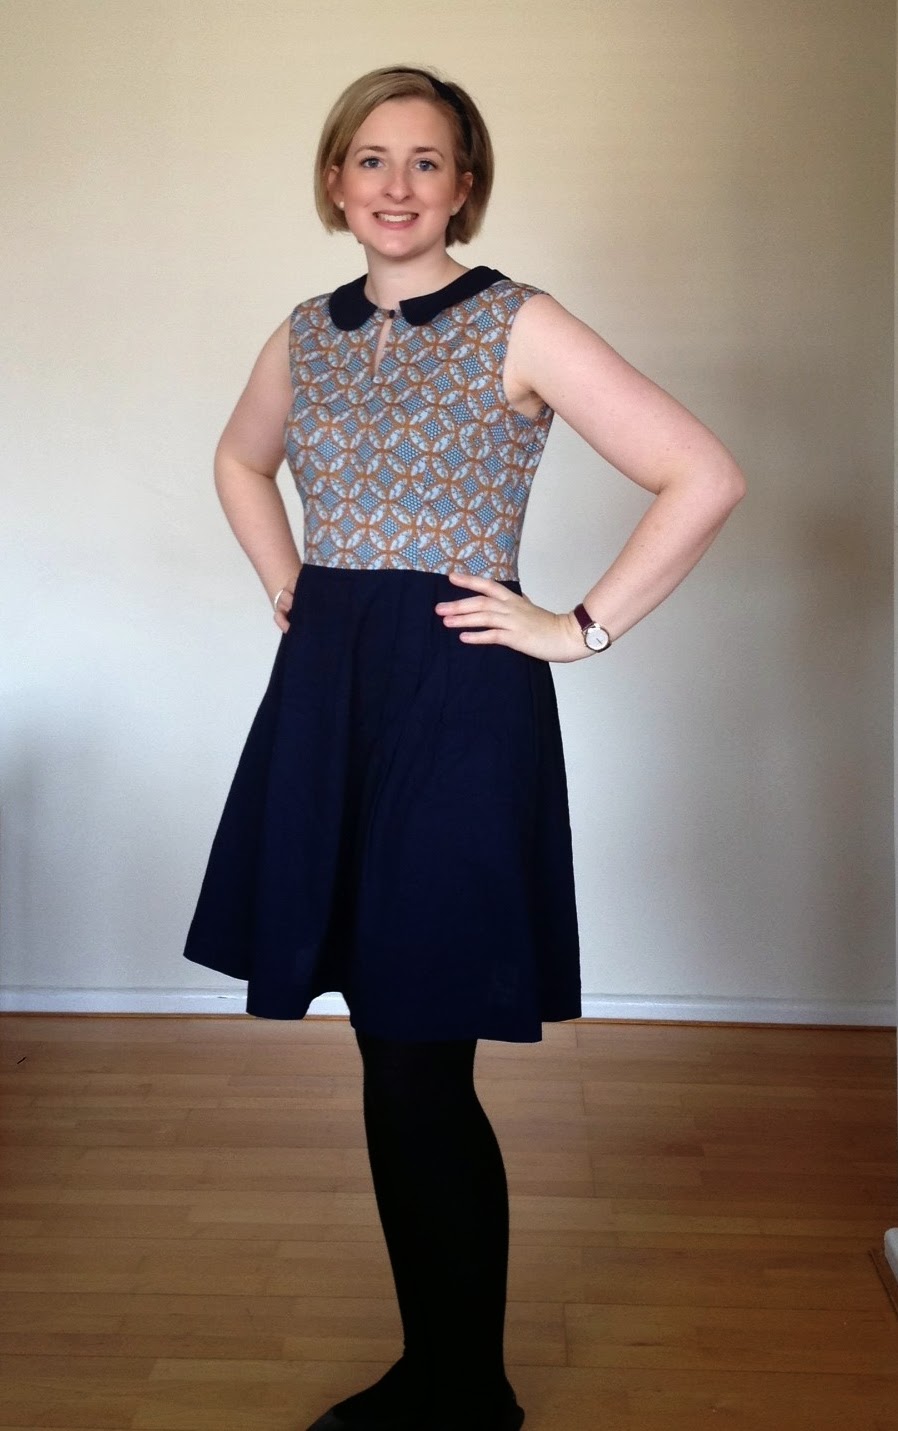
The design of this dress is actually very similar to the Emery dress but with a pleated rather than a gathered skirt, and a front neckline slit and button. I made version B which is sleeveless and has a peter pan collar. I cut a size 12 grading out to a size 14 from the waist onwards.

Simplicity 1419 round trip dress

For the fabrics I used a left over Japanese lawn from Spotlight for the bodice and pockets, and leftover navy broadcloth for the skirt and collar. I used these fabrics last year to make my sister and I BHL Polly Tops. The broadcloth wrinkles like crazy but I love the two contrasting fabrics together.  I made the dress following the instructions precisely and made no adaptions to the pattern (other than grading). I found the neckline a little confusing  as the facing and front bodice are cut without the neckline slit. The slit is cut into the neckline after you sew the facing to the bodice in a diagonal shape with the two sides meeting at a centre front point. It seemed a little confusing at first, but the instructions were spot on. Next time I wont doubt the instructions.

Simplicity 1419 round trip dress

The dress came together very quickly. The bodice has neckline facings and uses binding for the arm hole finishing's but you could easily use the bodice pieces to line it instead. I overlocked all the edges to finish the dress.

Simplicity 1419 round trip dress

I love the final dress, but now have an idea of the changes I want to make for the second version. I definitely need to take some length off the bodice so that the waist sits a little higher. Maybe just half an inch. My next version probably wont have a collar so I hope the neckline doesn't look/feel too high without it. I can always lower it a little.

Simplicity 1419 round trip dress

I just got my hair cut after making this dress. I hate getting my hair in my face so I decided to make a matching headscarf using Bluegingerdoll's free PDF pattern. The pattern is just a glorified rectangle with rounded edges but it was late and it was easier to follow the pattern than take my head measurements etc. I made it double sided to match the dress and I wear it folded over. I think I'll make a few more in different colours.

Simplicity 1419 round trip dress

This is how I actually wore the dress today (sans Jacket). Winter has really set in now. Apologies for more indoor shots but there's not much I can do with the very shorts days we're having. I have some more makes I'll try and get photographed on the weekend outside.   

Monday 16 June 2014

Wool Wrap Besty Skirt

I bought this divine wool rayon blend fabric at The Fabric Store earlier in the year with a pencil skirt in mind. I'd been planning to try and perfect Gertie' s pencil skirt but was soon distracted by Bluegingerdolls Betsy Skirt. I made up version A for pattern testing/blog tour, and version C for a wedding. I saved what I thought was the best for last for this beautiful wool: Version B, a buttoned wrap pencil skirt.

Bluegingerdoll Wrap Betsy

My two previous Betsy's were a simple sew that came together well. Unfortunately, I had a few problems with Betsy number 3. I had Office Works re-print one of the pattern pages (size AO) and I combined pieces cut from this newly printed piece with some of the pieces I'd already cut from one of the old pages Abby sent me. I told officeworks to print it actual size, but the waistband and facing pieces were both a good 4" too long for the skirt. I assume it was printed incorrectly. Because of this issue I couldn't follow the notches on the waistband and instead just "winged it" and then trimmed off the excess. I did the same with the wrap facing.

Bluegingerdoll Wrap Betsy

Due to the above issues I ended up putting aside the instructions and just doing my own thing. The fabric was a dream to cut out and sew. However it doesn't press well at all so the hem and facings bubble up. I'm thinking about stitching down the facing of the inner skirt front completely. Strangely it wrinkles well despite not pressing!

Bluegingerdoll Wrap Betsy

I again cut a size 12. As this fabric has little stretch the fit is pretty spot on though my legs. The waist is a little roomy at the top and I think the skirt could be improved (for my body at least) by drafting a curved waistband so that the top tapers in with my waist.

Bluegingerdoll Wrap Betsy
 
The foe wooden buttons I used are from Tessutti. They are a little bigger than recommended so I played around the with button hole distances. I love the contrast of the tan button on the bright blue skirt.

Bluegingerdoll Wrap Betsy
 
Overall, I really like my final Betsy and know I'll get good wear out of her. The fabric is heavenly but something crisper, more easily pressed, might have been a better option. Big thanks to my work colleague Adriana for taking these photos in the cold and windy weather.

Bluegingerdoll Wrap Betsy

Saturday 14 June 2014

Sew Cheap June Free Pattern Review: Scarf Neck Cardy

This month my Sew Cheap free pattern make and review is a simple one: the Swoon Sewing Pattern Scarf Neck Cardigan for women. This is a four piece swing front knit cardigan with a scarf neck and angled hem line. There is a womens version (sizes s-xxl) and also a girls version (sizes 3-10). This makes for fantastic matchy matchy potential for some mummas and daughters out there. 


Swoon Scarf Neck Cardigan

Thanks to Oanh for drawing my attention to this freebie the week before Sewaway. I quickly put the PDF together (32 pages including instructions) thinking it might be a nice easy make to take with me for a weekend away sewing. It was to be after I found this speckled beige t-shirt knit at spotlight on sale for $3/metre. The fabric has poor recovery so it's ideal for a loose fitting cardigan (compared to leggings or a wrap cardigan for example). 

Swoon Scarf Neck Cardigan

I cut a size medium based on my waist  measurement thinking I'd like the cardy to be roomy. After finishing my round trip jacket I was keen to get into an easy make. Unfortunately, I only cut and packed one sleeve for the cardigan so it was left unfinished until I got home. Aside from this, the cardigan is a very easy make, especially if you have an overlocker. If you're like me then you might think your cardy looks more like a one armed poncho half way through sewing- I promise this is normal (well, not the one armed part). You just need attach the front collar to the back piece at the neckline. The front collar, hem and sleeves are all hemmed by simply turning over and stitching with a stretch stitch or zigzag.

Swoon Scarf Neck Cardigan

The instructions are brief but include a couple of diagrams to help you out. For those who don't have an overlocker there are also instructions included on french seaming. I've never french seamed a knit before. If I didn't have an overlocker I'd probably just sew the cardigan using the 3/8"S/A with a stretch stitch. This project is totally beginner friendly, especially as the final product is a reasonably loose fitting garment so fitting and choosing an appropriate knit fabric are not that important.  

Swoon Scarf Neck Cardigan

I made no changes to the pattern, or during construction. The fit is spot on, I think. It is roomy, but I like to be able to layer up singlets, long sleeves and cardy's in winter. The smallest size is a small and I think an XS lady might find it a little too roomy. I will absolutely make more versions. A black merino version is most definitely on my 'to sew' list. 

Swoon Scarf Neck Cardigan

This is a cardigan that fits effortlessly into my wardrobe, particularly my weekend wardrobe. Tim took these photo's out in south Melbourne today where we stuffed ourselves silly with what Tim thinks (and I don't disagree) is the best burger in Melb. I'm looking a little disheveled from the cold breeze but I'm counting myself lucky that I wasn't covered in mustard or burger grease. 


Swoon Scarf Neck Cardigan

If you like this post, check out my Sew Cheap: Top Tips Sew Cheap: Free Patterns and previous Sew Cheap posts. 

Wednesday 11 June 2014

Simplicity 1419 Round Trip Jacket

I was the lucky winner of the Simplicity 1419 Round Trip Dress and Jacket Pattern being given away by the lovely Kestrel of KestrelMakes. I adore both the jacket and the dress and was stoked to win it as the pattern is not yet released in Australia. Check out Lucinda and Manju 's fantastic versions of the jacket and Erika's sweet deer version of the dress.

Round Trip Jacket SImplicity 1419

I wasn't too sure of what fabric to use for the jacket. In the end I decided on, with help from Lisa, an amazing Japanese cotton from Tessuti Fabrics. It's a lightweight black cotton with a grey sashiko embroidery pattern. The fabric was wonderful to sew with. I also bought beautiful Blue Bloom Japanese cotton for  a Round Trip Dress.

Round Trip Jacket SImplicity 1419

I made up a size 12 based on my chest measurement. I think the fit is perfect in the bodice, but the arms are a little firm. I'd like to make up this jacket again, perhaps in a cotton sateen, and I will sew the arm seams with smaller S/A around the biceps for some extra room. Fabric with a bit of give in it will also help. 


Round Trip Jacket SImplicity 1419

I didn't adapt the pattern at all. I wanted to do the lovely cotton justice as I know I'll be getting lots of wear out of it so I bound most of the seam allowances with black bias binding. The construction of the jacket was super simple and it came together in about 4 distracted hours at the Mill Rose Sewaway. Of the four garments I started, this was the only garment I finished. 

Round Trip Jacket SImplicity 1419

I love my new jacket and I can see more in my future, I might try the pattern without the ruffle as well. Stay tuned for my wearable muslin Roundtrip Dress. 

Tuesday 10 June 2014

Giveaway Winner: Bludginger Doll PDF Pattern Winner

The winner of the Bluegingerdoll Pattern PDF provided by Indie Stitches is the Lovely Ruth Procter of Nightingale & Dolittle. Congrats Ruth!


Ruth, like many others, asked for the Winifred dress. It's now coming right your way miss! I'll be in contact to organise.

More interviews with fab locale and/or small Indie Pattern design companies coming to the blog soon :)