Showing posts with label Vogue Patterns. Show all posts

Sunday, 30 December 2018

Made in 2018 (Warning: long post!)

Hello to those still following this blog! I haven't blogged since 1 January 2018, so it's probably about time I posted a round-up of my 2018 handmades.
It's a long post! So here's a summary for those after a quick fix: 
2018 was a year of boxy tops and dresses, ruffles (sleeve, back and bum!), and lovely linen fabrics. I had success with a new pants pattern but the second half of the year focused on maternity friendly dresses. Hoping to get back to sewing pants late 2019. Below are some very glamorous selfies taken in the spare bedroom, work toilets and foyer. Enjoy!

1. In Progress...
In addition to a couple of unfinished dresses I'm hoping to get to before the end of summer, we're expecting our first baby due in March 2019! All is well with both baby and I. I haven't been sewing any maternity clothes per se but my love for tent dresses has really come in handy.

2. Black Feather Viscose Tessuti Lois Dress
This Lois Dress was a follow up from my wearable muslin - details here.  I prefer my first version which got a lot of wear last summer. But this black version has been a great option this summer as the floaty skirt still fits over my baby bump and is less sheer than the white version.


3.  Pineapple Ruffle Sleeve Noelle Top
I get so much wear out of my navy spotty ruffle sleeve top made late last year - another version was a no-brainer. I made both tops from a slightly modified version of the Ulooop Noelle top pattern, but those ruffle sleeves are a simple addition to any boxy top pattern. 


This version was meant to be a casual summer vibe -  but I wonder if it's actually pyjama resort wear?


4. Double Weave Linen Cotton Gingham Dress
This dress is another modified version of the Ulooop Noelle top pattern. 


Modifications include: cut width from the Centre front (see previous ruffle sleeve tops for details), sliced the back piece below the underarm for a ruffle back (details in ruffle top version), and lengthened for a mini dress. 


I found the double weave linen cotton blend (bought from The Cloth Shop) too heavy for me, but the dress found a new home with a good friend, and it has since received the love and wear it deserves.


5. 2* Butterick 6182 Box Top
My first Butterick 6182 is a copycat from a display at The Cloth Shop in Ivanhoe. After months of eyeballing the fabric pattern combo I made my very own out of this beautiful cotton soon after to be followed by a navy linen/cotton blend.


I followed the pattern as standard - no changes necessary. The sleeve bands and front darts make this pattern a little more interesting and well fitted compared to other boxy tops I've sewn.


I've gotten a lot of wear out of these tops and thankfully they also work well with maternity skirts etc. I particularly love the navy version which has a nice drape.


6. Linen Tessuti Lisa Dress
I made this Tessuti Lisa Dress early 2018 and it got some good wear at the time. But it's been a godsend this past month or two as the weather heats up. There is so much room in the skirt that you almost can't tell I'm pregnant which is a nice change.  


I think the buttons may be cut just low enough to also work as a nursing dress without any modifications. Otherwise, I could lower the curved bodice/skirt seam a little and add an extra button for a great nursing dress/top. 


The pattern comes together well with lovely neat insides. I made the size small. Personally, I think the armscye is a little big with the underarms cut too low. On me, you can spot the side of my bra.  But, that's allowed for more bust room which is helpful at the moment. This version is made from a green/white chambray waxed linen from The Cloth Shop. I will definitely be making this one again.


 7. Black Linen Megan Nielsen Flint Pants
Not much to say as these are my fourth pair of the Megan Nielsen Flint Pants/Shorts. Details on previous versions here. 


As done previously, I've removed the front box pleat and added a double side button rather than one bigger button. I find the double button to be more secure and keeps the waistband from folding down.


 I LOVE this pattern and look forward to squeezing back into my Flints.


8. Denim Persephone Sailor Pants 
The Anna Allen Persephone Sailor Pants & Shorts were my first foray into sewing Jeans and a button fly. To sum up - I think this is a great first jeans pattern for those starting out!


The covered button fly means you can have some fun with your buttons rather than using metal jeans buttons. I went with plastic white and navy striped buttons on the covered fly and a navy sailor button at the waist. Next year I need to conquer metal buttons and hardware. 


I used non-stretch denim and found the fit pretty good but not super comfortable when sitting. Next year I'd be keen to sew up a black stretch denim pair.  


9. In the Folds Peplum Dress
If you haven't already checked out the free In the Folds patterns available on Peppermint Sewing School - Stop and do so immediately! There are a handful of fantastic patterns available, including the Peplum Top. I've sewn the top up twice before - both getting a lot of wear. Given how high the peplum starts the top is maternity friendly if you extend the peplum length. 

I made a dress version out of some gingham linen (also from The Cloth Shop) to get me through a big-bellied summer. I intended to make a size up for a little more bust room - but accidentally went up two sizes making the dress a little too big. But it works for a comfy summer dress and I'm keen to make another slightly smaller version. 

10. Burnt Orange Bum Ruffle Dress
By far my favourite make of 2018! This dress is the very popular Vogue 9237 Back Bum Ruffle Dress sewn in a vibrant medium weight burnt orange linen (Yep - fromt The Cloth Shop). The fabric easily transitions from winter to summer outfits - but I actually prefer it layered up with winter tights, boots and cardigans.


 Ruffles, Pockets, Maternity friendly - what's not to love?


Well actually the armsyce and neckline are way too high and restrictive, but both are an easy fix. I took around 1/2" from the neckline and the underarm. I have summer version in progress in a lighter fabric.


Thanks to those who made it through this giant photo dump. I'm not sure how often I'll blog next year. I mainly use instagram to follow along with the online sewing universe. Hope to see you there!

Happy New Year!

Tuesday, 5 May 2015

Modified V1247 Skirt

I've made the high waisted mini a line skirt included in V1247 four times before. Two for myself and two for a friend. Throughout these renditions I have followed the instructions exactly, and then added length to the skirt, added length to the back zipper lap, removed pockets, bound all seams and serged all seams.


I love the shape of the pattern and the sweet front pockets, but for this fabric I didnt want to worry about pattern matching across the pockets. Instead, I overlapped the front and back top and bottom pattern pieces on the fabric as if there were only two pattern pieces rather than four. This makes for a much simpler skirt design and construction process. I pattern matched the skirt at the side seams and centre back.


I also added 2 inches to the length of the hem and an inch to the lapped zipper. I sewed up the seams with 1/2" seam allowances for a little extra ease to allow for tights, layering and adding a lining. I used leftover navy poly lining and recut the two main skirt pattern pieces. I sewed up the lining and attached it to the inside of waistband (facing). I hand stitched the lining centre back to the zipper. I machine stitched a narrow hem on the lining, but hand stitched the hem of the skirt.


The fit of the skirt is excellent, but form fitting enough to feel uncomfortable after a big eating weekend. It's a size 12 (with extra S/A), which is the largest size in the AA pattern envelope. I plan to make this pattern up again and again. Maybe not having to buy the larger pattern envelope is enough incentive to have less big eating weekends. Probably not. 


I love the the final skirt. It's a great length for a winter skirt, warm, and the lining helps with how the skirt sits over tights. This skirt will certainly brighten up my outfit amongst the usual black business attire that us Melbournians love so much. Although, as you can see, everything else I'm wearing is black black black. 


Thanks to Jess for taking work break photos. 

Monday, 12 January 2015

Vogue 8901 Or The Dress With Room For Your Cat

First up let me say this post is going to be photo heavy as I wanted to show the dress in it's best and worst light. V8901 is a dress pattern with maxi or knee length options, a lined bodice front and back that overlap around the sides and a pleated skirt. The pattern provides either a centre back zip or long key hole back option. There have been mixed reviews about the fit of this dress and all versions I've seen have had at least some underarm gaping where the bodice overlaps. Perhaps you're thinking how lovely and smooth my dress looks? No gape in sight.


Yeah, right! And then I stand with my usual bad posture and the gape appears. However, it is a thousand times better than what it started out as. 


I cut a straight size 12 of version A. There are only a couple of pattern pieces however the bodice pieces are cut twice as it is self-lined. The fabric is a very pretty cotton Lawn from The Cloth Shop. It's very like liberty in its soft feel and ability to take a really crisp press. I adore it! 


I made the bodice and tried it on for size. In the below photo the left side has had the excess fabric pinned down around the side overlap. On the right side you can see that the mighty gape is a suitable pocket for keeping your pet (or pincushion) cat. The gape is oh so unflattering, revealing and just plain silly.


I pinned the excess fabric out of the sides which caused the front sides to drop below the waist line by about 3cm. I then basted the bodice pieces together and trimmed the fabric to re-balance the waistline. I had to hack quite a bit of fabric off to make it even and I was concerned about the loss in bodice length. To combat this I cut a waistband to insert between the bodice and skirt and I actually really like the look of it.  I tacked the overlapped bodice together just under the arm hole for modesty.


Regarding fitting, I also took 1/2" from the shoulders and fitted the zipper with a 1"S/A at the centre back neckline ease down to the 5/8" allowance. I still have excess gape in my centre back and centre front, but this was the best I could do while keeping this dress wearable. 


Fitting aside, the dress was a simple and fast project. The bodice and lining is constructed first with the lining pulled right side out through the bodice shoulders. A self lined bodice looks so neat and may actually be faster than neckline and armhole binding.


The pleats took some time to carefully press and sew, but I have so many gathered skirts that the pleats are a nice change. I sewed a really narrow hem (I'm 5'4). Taller ladies, add length if you want more coverage. The instructions were clear and easy to follow.


I would like to make a fancy maxi version of V8901 but I'd need to smooth out some of the above fitting issues first. Though, I had a lot of fun making this dress. It's far from perfect but I'll definitely get wear out of it over summer.

Thursday, 8 May 2014

V1247 Two. Three. Four?

This is just a quicky to document some more V1247 skirts I've made recently. You can see my more detailed post from my first skirt here

vogue 1247 cord skirt

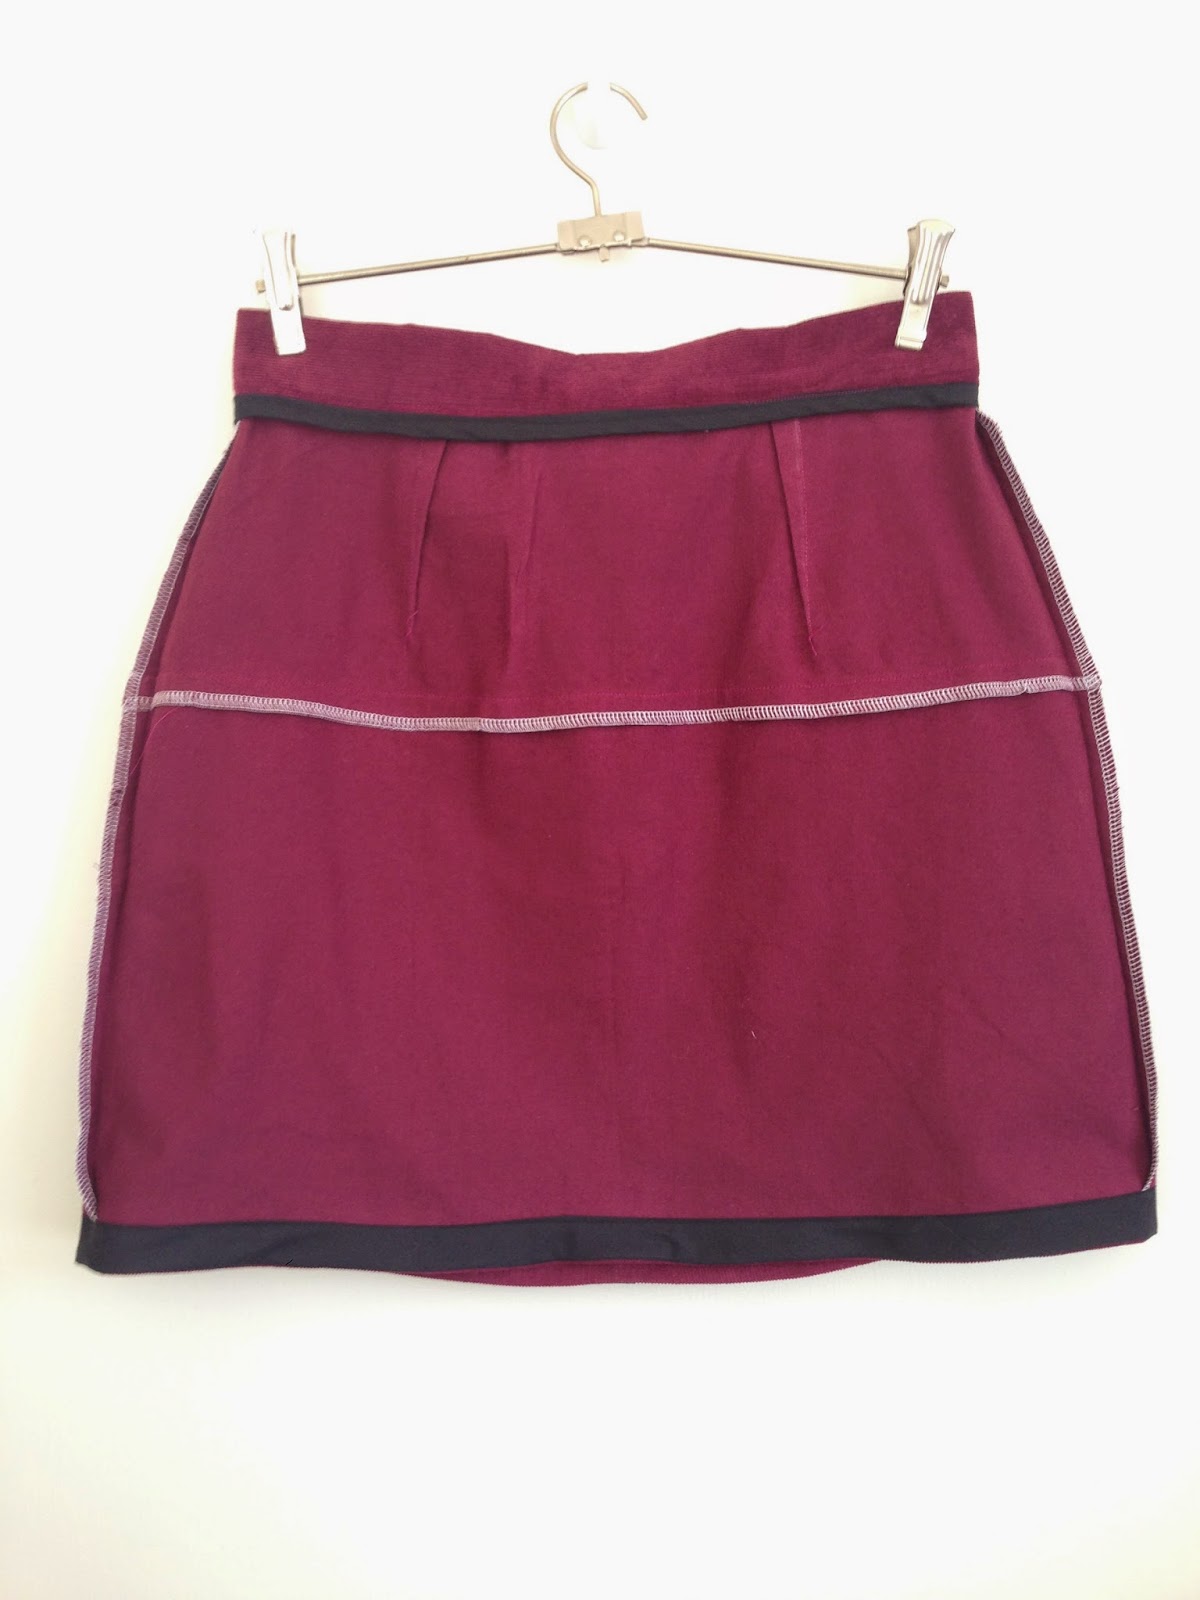
As I mentioned in my first post I was making a version for a special friend. For her version I  made a size 8 in a navy cord I had in the stash. I bound all of the inner seams in a mauve pre-bought bias. The only change I made to the pattern was to add 1"to the hem. The skirt came up a treat, and fits perfectly. Lucy loves her skirt so much she asked for another one! Together, we went to the Fabric Store where she choose some black mole skin fabric. I plan on sewing this version up very soon, and then having a rest from this pattern. 

vogue 1247 cord skirt
Insides: Pockets and fully bias bound

Lucy's skirt inspired me to make a cord version of my own. This version I made again in a size 12 but with a few changes. I added 1"to the hem (for modesty), sewed the side seams at 1/2" rather than 5/8" (for fit) and added an 1"to the waistband (1/2"either end, again for fit). The skirt is still very fitted but, I think, a bit more flattering than my first iteration.

vogue 1247 cord skirt

I was desperate to make this version from some maroon cord, but only had a narrow metre. The only way I could fit the pieces was to omit the pockets. This was really easy to do by just folding out the pocket component of the tissue paper. No pockets made the skirt even quicker to sew! For this version I overlocked all the seams and bound the hem and waistband with bias tape.

vogue 1247 cord skirt
Insides: no pockets and limited bias

I'm really happy with how the skirts turned out. The 1" added length is perfect for wearing with tights. For a summer version I might add a further 1". I now own a skirt pattern which I adore and feel confident in adjusting as needed (pockets/no pockets, bias/overlocker, fit/length etc).

vogue 1247 cord skirt
Matching V1247 cord skirts

Thursday, 10 April 2014

V1247 Staple Black Skirt

I love skirts. My go-to outfit is a skirt and t-shirt on the weekend or blouse during work hours. In winter, add tights. There are many versions of the Vogue 1247 skirt on the internet but after seeing seeing Amy's Hipster Deer version I knew I had to have this pattern! Coincidentally I thought it was the perfect shape and style to make for a friends birthday present. Thus, a reason to buy!

Vogue 1247 Skirt

The skirt is a very simple one pleat style but with the added interest of back and front yokes and front pockets. The instructions are written so that all exposed seams are encased in binding making for very fun and pretty insides.

Vogue 1247 Skirt

I decided to make myself the skirt first to iron out any issues before making my friends. I cut a size 12. My measurements actually put me in the size 14 but I think this style skirt should be much more fitted than shown on the pattern. This also meant that I could buy the smaller sized pattern which would cover the size I needed for my friends itty bitty frame. In hindsight, a little more ease would have been nice. Next time I might use slightly smaller seam allowances or otherwise use a fabric with a bit more give.

Vogue 1247 Skirt

I made up this first version  in a very cheap black drill. It photographs badly, has no give and marks under an iron. For future makes I might use heavier weight fabrics or perhaps line the skirt. I'd also like to try it in a fabric with a bit more stretch. While the pattern instructs you to bind every exposed seam, you could use an overlockers/zig zag instead. I knew I wouldn't have enough pre-made bias on hand to bind all the seams so I decided to encase the pocket, front and back yoke and hem seams and zigzag the side and centre back seams. For the closure I used a stray red and white gingham button for a pop of colour. Upon seeing the back of my skirt Tim said: "Is that a button at the back? That's funny!". I didn't realise back closing skirts were funny?

Vogue 1247 Skirt

I think the A-line shape of this skirt calls for an above the knees length, but it is very short. To keep as much length as possible I hemmed it using bias binding (e.g. 1/4" hem). For my future makes I'm going to add at least an inch , maybe more.

Vogue 1247 Skirt

The skirt was fantastically quick make! From cutting the pattern to finishing it, it only took an hour here and there. I love how it turned out, but the length makes it a skirt only to be worn with tights! I can see myself making many more of these skirts, but first, a navy cord version to be gifted. 

Vogue 1247 Skirt