Saturday, 27 September 2014

Negroni 2: A Pattern Hack

Last month I made Tim a muslin Colette Patterns Negroni Shirt for his birthday with the promise of making more in the future. He wears his shirt to work regularly but had a few suggestions for improvements. Tim requested: slimmer cut sleeves; a traditional button band and placket rather than shirt front facings; a stiffer collar with a collar stand.

Negroni Archer shirt hack

I could have tried a different pattern, but they often lacked other must haves (e.g. back yoke, contrasting cuff placket, slim fit). So, in attempts to get the best of all worlds I spliced together the Negroni Pattern with my beloved Archer shirt pattern (made here and here). On comparing the sizing of the Tim's store bought shirts with my Archers I found that the width of the collar and collar stand was pretty much the same, but the length of the collar/stand/neckline would need to be increased. Same goes for the button plackets. 

Negroni Archer shirt hack

Note: Peter has done some tutorials on adapting the Negroni pattern for a traditional placket and collar, but of course I didn't realise until after making the shirt.
So, here what I did:
- Photo copied Archer collar and stand patterns. Added about 1/2" to each piece at the fold/centre line. Thus providing 1" more neck room.
- The Archer pattern has 1/2" seams allowances, Negroni has 5/8". Before attaching the collar stand I trimmed down the Negroni neckline by 1/8".
- I interfaced both sides of the collar and collar stand for a stiffer collar. Although I really need to buy some shirt crisp interfacing.
- I compared the Negroni shirt front to the archer shirt front. If you line up the button placement line on either pattern it's easy to see where you should add width for the right side (where the button placket is folded over) and remove width for the left side ( where you attach the button placket). It's important to consider: 1) women's shirts button up the opposite way to men's; 2) remember to use 1/2" seams allowances or add 1/8"to the right side of the shirt and the contrasting button placket; 3) add length to the button placket pieces as the shirt is much longer than the archer pattern.
- Trimmed down sleeves by 1/2". I cut and overlapped the pattern by 1/4" in two places on each sleeve. I also decreased the width of the cuffs pleat to allow for this.

Negroni Archer shirt hack

The changes worked out even better than I expected (it was a gamble cutting straight into the 'good' fabirc). I particularly prefer the crispness of the button placket on this version compared to the Negroni pattern. Next time I will take more width out of the sleeves as they are still baggy. Luckily this is a casual shirt, so Tim will wear it most often with the sleeves rolled up anyway. I'd also shorten the shirt slightly. Unfortunately I didn't notice on the first version as it's always tucked into work pants.

Negroni Archer shirt hack

I made Tim's shirt out of two gorgeous linens from Tessuti. The check is Heart On Sleeve and the solid is Indigo flip (I think). The fabric was amazing to sew with and I was pleased with my pattern matching efforts on the side seams and centre front. Sadly, I only have a small amount of the check left so I wont be able to make a matching top for myself. 

Negroni Archer shirt hack


Thursday, 25 September 2014

Open Wide Zippy Pouch

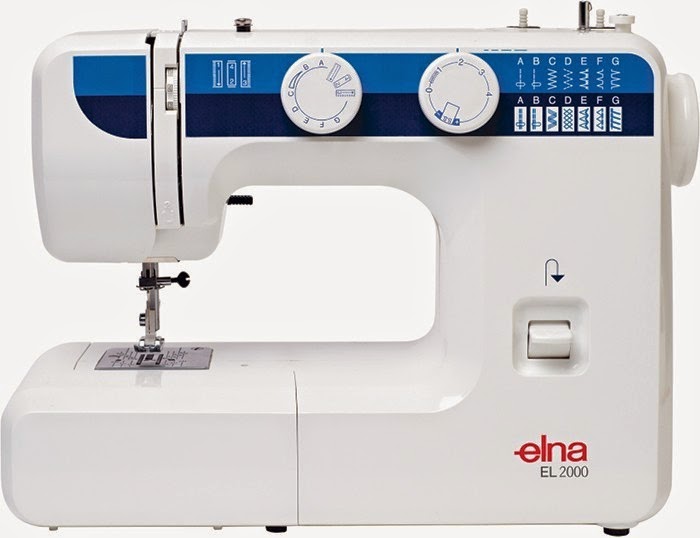
For my little sisters 18th birthday, Tim, my sister, brother in law and I bought her a basic sewing machine. It's an Elna 2000. Pretty much identical to my Janome except that it already includes additional feet. Gen's a crafty lady and I know she'll get some good use out of the machine over time.

To go with the machine we purchased a few "getting started" goodies like scissors, pins, etc. All we needed was somewhere to put those goodies. I found the perfect fabric at spotlight to make up a zippy sewing pencil case.

Open wide zipper pouch

For the pattern I used the colour blocked version of the open wide zippered pouch tutorial from Noodlehead. In the spirit of Scraptember I used scraps from two of my Alder Shirtdresses for the lining and lower part of the pouch. I also got scrappy when interfacing. I used lots of small left over pieces to cover the lining pieces. I wonder, do others throw out small pieces of interfacing or do you piece it together?

Open wide zipper pouch

The tutorial is fantastic! There are three different size options. I made the largest for my sister and a medium one for myself. I will definitely make more for makeup bags, odds and end etc. It would be great to try a waterproofed fabric version. It's a great project for using up fabric scraps. 

Open wide zipper pouch

Happy 18th Birthday Gen!

Sunday, 21 September 2014

Sew Cheap September Free Pattern Review: Hot Cocoa Sweater

This month I've been dealing with headcolds and a lack of inspiration. I have a number of free dress patterns I'd like to sew up for my monthly Sew Cheap Make and Pattern Review, but the weather isn't quite on my side yet. Enter Dixie DIY's Hot Cocoa Sweater. This pattern is a one size only, loose fitting, raglan sleeve, cropped high-low knit sweater. It's been made up my many other bloggers so get google-ing for more photos and inspiration.


In terms of sizing the sweater is recommended for women with a bust size of 34". However, the finished bust is a loose fitting 39". I'm a 35.5" bust and there is still plenty of room in chest area. Because this pattern is a loose fitting knit, it will fit across a fair few body types/sizes. It's also a fairly simple pattern so it should be reasonably easy to fudge your way through some basic grading.

I made up the sweater in a cozy light weight sweater knit from the Clear it warehouse. I can't recall the fabric content. What I can say is that it's incredibly soft, is grey and has a pretty silver thread through it. The colour is fairly dull, but perfect for a cozy weekend wear.


I sewed the sweater on my overlocker following the instructions precisely, except for top stitching the collar and seams. My sewing machine despises knits and I was lucky just to twin needle the hem without my machine eating the fabric and creating holes. The instructions don't have any diagrams but are thorough enough for most beginner sewers.


Something I LOVED about this pattern was the actual PDF. Each of the pattern tiles is positioned to the top left of page so that there's only left over paper to the right and bottom of the page. That means that you dont have to trim the pages before taping them together. This made me so happy. Dixie removed an entire step from the process! Why aren't all PDF patterns like this?!


I also love the resulting Sweater. I can definitely see a few more Hot Cocoa Sweaters in my life. Changes I'd make next time are to lengthen the arms, they are about an 1"too short; take the cuffs in by about 1/2" for a firmer fit, and; vary the length and make some non high-low versions just to mix things up. Overall, the Hot Cocoa Sweater pattern is a great beginner friendly option for a loose fitting knit jumper. The only draw back being that it comes in just one size.


Only three more free pattern makes and reviews for the year. Any body else freaking out about how quickly this year is passing and the prospect of the soon-to-be here Christmas period?

If you like this post, check out my Sew Cheap: Top Tips Sew Cheap: Free Patterns and previous Sew Cheap posts. 

Sunday, 14 September 2014

Emery - Elisalex Hybrid

Early in this year I bought the Emery Dress and the Elisalex Dress patterns from Indie Stitches. I've since posted three emery dresses plus two emery skirts. In contrast, I've posted 0 - zilch Elisalex dresses. I have actually made one Elisalex, which I've finally made wearable, that I'll post another time. I ended up loving the Elisalex skirt, but the fitting issues with the bodice just weren't worth the effort for a basic princess seamed bodice (more on that to come). Enter the Emery Elisalex hybrid.

Emery Elisalex Dress

I bought this amazing fabric from kinki gerlinki who sell a small amount of varied unidentified fabrics. I have know idea what this fabric is. The rose print is embroidered on with a soft (maybe silk) thread) and the peach background fabric is sheer, crisp and melts under a warm iron. It's quite sheer so it had to be fully underlined in a white cotton lawn (e.g. what I had around).

Emery Elisalex Dress

To make my Emery Elisalex hybrid I cut an Emery bodice in a size 6, grading to an 8 from the bust down. I made my usual alterations (see here)I cut the Elisalex skirt in a size 14 and shortened the pattern by 9" (I'm an average 5'5 tall). 

Emery Elisalex Dress

After underlining all the pieces I sewed the dress pieces together with French seams (except for the waist and back seam. I basted the skirt to the bodice to see how the seams, darts and pleats aligned from the two patterns. They were way off! I unpicked the skirt pleats and re-pinned the skirt to the bodice aligning the centre back and side seams. I then re-inserted the box pleats, making them the size of the left over fabric. This means that the back pleats ended up being slightly wider, and more similar to the original pattern, than the front pleats.  This isn't too noticeable while on and I'd rather it to unmatched seams.

Emery Elisalex Dress

I used the zip I had on hand, which was white. I regret it. moving right along. I finished the armholes and neckline with purchased bias binding. So that the shell of the dress was uninterrupted I hand stitched the binding and hem. It was really nice to take the extra effort with this dress and it does make it feel a little more special.

Emery Elisalex Dress

I'm really happy with how this Emery Elisalex hybrid dress turned out. I'll definitely be combining these patterns again.  It's just a little bit extra special compared my usual makes. I wore this dress to the Melbourne Frocktails event hosted by Oanh. There were so many gorgeous dresses in one room. In fact we got asked by a man in the restaurant who we were and why we all looked so fabulous? It was a lovely night, but of course we all wished we were attending the Sydney version.

Emery Elisalex Dress

Saturday, 6 September 2014

Colour Blocked Jackie Coat

Long time, no post. Would you believe I just haven't felt like sewing lately! I haven't been much inspired by any of my fabrics or patterns. I think this might have something to do with the changing seasons. None-the-less I have something pretty special to share. I bought the Jackie Coat pattern from Iconic Patterns so I could "sew-along" with the Janelle and Maria during July and August. Unfortunately I was a little late to sew-along but was thankful for their great posts explaining each step. 

Iconic Pattern Jackie Coat

I've had my eye on the colour blocked coat style for a while and had a heap of pins-piration to draw from. I ideally wanted a swing coat and originally thought about modifying the Albion Coat pattern as I'd already made it once for Tim. But why re-invent the wheel? The Jackie Coat had just the right amount of swing and I loved the idea of playing with the blocking placement and welt pockets. 

Iconic Pattern Jackie Coat

I cut a Size 10 grading out to a 12 from the waist down. In the end I probably could have dropped down a size but more room in a coat for extra layers never hurt. To enable the colour blocking I cut the front, back, and facing pieces in half 9cm below the lengthen/shorten lines. For the sleeves I made the cut at the top turning line (makes sense if you see the pattern). I then added 1/2" seams allowances. Because the Jackie Coat is asymmetrical most of it is cut on the single layer (not on the fold). This, along with having doubled the number of pieces to be cut meant that cutting out was rather a long process. 

Iconic Pattern Jackie Coat

For the fabrics I chose a black and cream flannel wool from AH outlet and The Cloth Shop respectively. The lining is a pink silk twill with printed polkadots for the Fabric Store. I love the pop of colour. I knew I wanted to keep the coat really simple on the front so I dropped the bound button holes for these beautiful snap fasteners from The Cloth Shop. They are quite big with a lovely cream speckled plastic component as well as the heavy duty metal inner.

Iconic Pattern Jackie Coat

Sewing up Jackie was surprisingly simple. Unlike usual I took my time and enjoyed the process. I catch stitched all the inner seams allowances down so they wouldn't shift and move once the lining was in. I added black/cream top stitching at all the colour blocked seams to help define the lines. The welts aren't perfect but they're good enough and I really like how the black welt pocket intersects through the cream fabric.

Iconic Pattern Jackie Coat

The Jackie Coat instructions are very good. The only time I got a little confused was bagging the lining. I've never done this on a coat before so that's no surprise. I somehow ended up sewing my sleeves in a continuous loop so that if I was wearing the coat it would have been more of a straight jacket - a really stylish one at that!

Iconic Pattern Jackie Coat

The pattern is designed to be worn with the sleeves turned up, but I really prefer the look and length of them down. The coat buttons right up (see below), but that's not really me. I'm more likely to wear it undone. I love how my Jackie Coat turned out and I could see myself giving the pattern another go next winter incorporating a symmetrical centre front opening like Janelle has done. I'm so glad I got my butt into gear and made up Jackie before the warm weather settles in. 

Iconic Pattern Jackie Coat