Thursday, 31 July 2014

Sew Cheap July Free Pattern Review: Sew Loft Outfit

I'm generally quite excited to post about my monthly Sew Cheap free pattern make and review. This month, not so much. For my July Sew Cheap make I initially chose the Free Diana Cami pattern from Sew Loft. The singlet is a very simple, no dart boxy shape with a deep neckline and bias binding finish for straps and neckline. The cami come in sizes XS to SL (bust: 33" - 45").

Sew Loft Karina Skirt Diana Cami

So, I chose a crazy bright fabric for a flimsy skimpy singlet and then tried to take photos of it in the middle of winter. Clearly this singlet is more appropriate for the warmer months. I haven't shown my bare legs and arms in so long; I feel I may as well be starkers in these photos! To help me feel better about this incredibly bright top I decided to make a very boring (in a good way!) grey Sew Loft Karina Knit Pencil Skirt as well. The Karina skirt is another free pattern: a fully lined knit skirt in sizes XS-XL.

Sew Loft Karina Skirt Diana Cami

First up the Diana Cami: The Diana Cami Pattern has just two pieces (a front and a back) which makes it an easy PDF print at home option. I graded my pattern from a size small at the bust to a medium waist/hips.

Sew Loft Karina Skirt Diana Cami

The pattern instructions are incredibly detailed. The constructions involves French seaming the side seams, hemming, bias binding around the entire neckline/armsyce, making spaghetti straps out of bias binding, and sewing on your straps. I made two changes to the pattern constructions: 1. I folded over and sewed the tops of the front and back neckline to create tunnel's to thread my straps through. 2. I bought 1.5m of presewn satin strapping instead of making my own. I threaded the straps through the back and front neckline tunnels and doubled them over to the back where I sewed the straps down.

Sew Loft Karina Skirt Diana Cami

This fabric is oh so bright and bold, not to mention it's quite a stiff, but light weight, cotton. I think the Diana cami would be much nicer in a drapey silk or rayon. Hopefully I'll get some wear from the cami, but it might have to wait till summer when I can throw it over denim shorts.The Diana Cami is advertised as easy and I would agree with that. The trickiest/most time consuming part will be making your bias binding straps and adjusting them to the right height.

Sew Loft Karina Skirt Diana Cami

Onto the Karina skirt: I cut a straight size medium and followed the instructions precisely. They were simple, short and easy to follow. I made the skirt in approx half an hour, and it only took that long because I had double needle dramas. The Karina skirt only has one pattern piece which is used from the main fabric, the lining fabric and for the front and back skirt. I suppose this shows just how forgiving knit fabric is!

Sew Loft Karina Skirt Diana Cami
The skirt is a little on the firmer side than my preference but the double layered fabric, from the lining, makes me feel more secure in it than other knit skirts I own. I'm wearing the skirt in these picture at waist height and it's very comfortable! I know I'll get plenty of wear from Karina. I've also styled it here for the current weather (i.e. I got cold!).

Sew Loft Karina Skirt Diana Cami

There are so many free multi-sized top and cami patterns around but fewer skirt patterns. I think this basic pattern is perfect addition to anyone's collection. The skirt is labelled as an 'Easy' - and it most definitely was!

If you like this post, check out my Sew Cheap: Top Tips Sew Cheap: Free Patterns and previous Sew Cheap posts. 

Tuesday, 29 July 2014

Alder Shirtdress #2

In case you couldn't tell from my earlier post, I'm kind of in love with the Alder Shirtdress. For my wearable muslin I made a size 6 version A (A-line variation). Next up, it was time to try version B (the butt gathers variation).

Alder Shirtdress Version b

My wearable muslin pulled across my chest but fit great elsewhere. I checked out Jen's sample dress' and noticed that her versions were quite a bit looser than mine so I decided to size up all over. This meant printing out another version of the PDF which is pretty darn huge. ugh!

Alder Shirtdress Version b

For this version I cut a size 8 all over and made no changes to the pattern. I used some lovely blue chambray with white polkadots that I bought at The Cloth Shop. The fabric drapes well but still has some structure and weight so it works well for the boxy shape. The polka dots must be bleached onto the fabric as every time I pressed the fabric I could smell chlorine. Oddly, I found this quite comforting on a cold day. It reminded be of summer days at the pool - quite the contrast from the current Melbourne weather.

Alder Shirtdress Version b

This version came together in a around half a day. The sewing process is almost identical to Version A, except for creating the gathered butt/side skirt panel and sewing it in to the main dress. I intended to French seam the whole dress but wasn't sure how to insert the gathered skirt component with French seam. For this part of construction you have to piece the skirt panel in to a square corner of the dress. This requires a little fiddling and also cutting into the dress. The panel went in fine but I have no idea how you would go about French seaming it. Also a note to future self, first sew around the corner of the dress to reinforce it before attaching the skirt panel and cutting in to the fabric.

Alder Shirtdress Version b

I used white thread for this dress and the same brown foe wood buttons I used for my First alder shirtdress. I omitted the chest pockets on this version as I thought the dress was busy enough. Once again I regret not adding in-seam pockets - next time I will definitely add them!

Alder Shirtdress Version b

The fit of this dress is relatively loose. I normally wear things with a very defined waist which this dress definitely doesn't have, but still has some nice waist shape with the added hip/butt ruffles. The fit is better across my chest in this version, if anything there is excess room. I think version B of the alder, loose and gathered, will be perfect in the spring/summer months. It's more interesting than a sack dress but is similarly loose and flowy. I think my A-line version looked better layered up and belted for winter wear than this version.

Alder Shirtdress Version b

I'm definitely keen to make a few more versions of the alder shirtdress. I'm thinking another VA, this time in a size 8 and then some alder shirtdress hacks, starting with a pull over version with a button placket ending just under my bust.

Alder Shirtdress Version b

Monday, 28 July 2014

Emery Dress: A TNT Pattern?

I don't want to speak too soon, but I think the Emery Dress pattern, may be a TNT (tried n' true) pattern for me. This is my third version and while none of the three (see dress 1 and 2) are absolutely perfect they are pretty damn good, imo. The style is absolutely me and the fit is pretty darn lovely.

Navy Emery Dress

This version began when I found some divine navy Japanese cotton at The Cloth Shop. It feels like Liberty (but half the price) and is wonderfully light. The print looks to be a navy and brown abstract rose pattern. I'm a sucker for blue! I bought the fabric and decided on the Emery pattern immediately.

Navy Emery Dress
 
For this Emery I cut my usual size (6, grading out to an 8 from the waist down). I wanted this dress to be unlined and sleeveless. The cotton is so wonderful against your skin and the fabric breathes really well so I thought it would be a great summer dress. In the meantime,  long sleeves, cardigans and fleece tights are my friend.  I finished the neckline and armholes with Navy bias binding.

Navy Emery Dress

The Emery Pattern was not designed to be a sleeveless dress so I altered the pattern by taking 1cm off the shoulders grading to nothing around the arm hole curve on the back and front piece. I didn't do this for my Full O'Heart version and it worked out fine so I thinks it's just a matter of preference.

Navy Emery Dress
 
One fitting issue I had  in my previous two dresses was some back neckline gaping. I made a couple of changes in this version to combat that: 1) I took 1cm off the top of the centre back bodice grading it to nothing to just before the tip of the back darts. I then inserted the zipper normally - thus having 2cm less fabric at the centre back neckline. 2) I sewed the shoulder seams at 7/8" (an extra 1/4").  This seems to have taken most of the gaping out and the slightly raised neckline is now just from bias binding not laying completely flat.
 
Navy Emery Dress
 
I love my new Emery Dress. It's my style, my colour, and is trans-seasonal. Who could ask for anything more? I'm also really happy with the small alterations I made to the pattern. I know I'll keep coming back for more Emery in the future. Perhaps it's time to start adapting the pattern and trying a lower neckline, pleated or circle skirt etc. 
 
Navy Emery Dress

Monday, 21 July 2014

Grainline Studio Alder Shirtdress - Wearable Muslin

I snapped up the much anticipated Alder Shirtdress immediately! I normally like to read about others experiences with patterns before purchasing but I'd so been looking forward to its release and I love Grainline Studio Patterns. Thus, I couldn't help myself.


I was immediately more attracted to version B with the gathered skirt details. When I've bought straight or A-line shirt dresses in the past I've often had too much bust room and not enough butt room. However I thought Version A would provide a better idea of the overall fit for my first attempt/wearable muslin. I made up this dress in some lovely pink/maroon chambray I bought at Clear It. I have some polka dot chambray put aside for my next gathered version. 


I made a size 6 which fitted my measurements and is also the size of my Archer shirts (1, 2). I made the shirt as per the instructions only deviating at the yoke insertion and sewing the front to the back where I prefer to use the burrito method. I also french seamed my side seams so there are no raw edges within. The sewing process is almost identical  to the Archer Shirt so if you've made the archer before you really shouldn't have any problems with the Alder Shirt Dress.


I  never had any worries about the upper body fitting me so it came as quite a surprise that I could only just button up the dress over my chest area and I prefer the look /fit with it left undone for this reason. This really surprised me because both my Archers shirts fit so well. I ended up unpicking the french seamed side seams and re-sewing as 1/4" which made the total side seam allowance 3/8"rather than 1/2" but I still feel more room is needed for my next version. The back doesn't look too bad just some slight strain at my under arms. The dress fits well though my lower body so next time I'm just going to trace/cut my fabric slightly wider at the chest area.


I've two possible explanations for the different fit compared to my Archers: 1) the dress is meant to be more fitted in the chest area (hence bust darts and no back pleat at the centre back. 2) I noticed when I was folding over the left button placket that the button placement I chalked on was totally wrong and ended up laying on the fold. It's possible that  I folded the placket wrong which left me with approx 1/2" less at the centre front than would be expected. This would be strange though as the construction is the same as the Archer Shirt and I've never had this problem before. I'm puzzled! If anyone else has had a similar experience or knows what I did wrong please comment!


I sewed up the dress in A navy thread which I think gives the dress some interest (it's especially interesting spotting all my terrible top stitching ;) ) and added some lovely foe wood plastic buttons. As this version of the dress is quite plain I thought it looked nice belted. I wore it out to a movie over my black merino renfree and under my Wool Drapped Coat. It's the perfect length for my drapped coat! Hooray for me-made outfits! 


Overall I love this dress (fitting issues and all) and I cant wait to make more. I can see a whole lot of Alder Shirtdresses and, variations of, for my 2014 summer uniform. My only other suggestion for my future makes is to add in-seam pockets.

Sunday, 20 July 2014

Sleeveless Archer Shirt In Winter

I've been getting some serious shirt on lately. Here is my Sleeveless Grainline Studio Archer Shirt. Soon to be bloged are my Alder Shirt Dress (wearing it as I type) and my first ever men's shirt for Tim. This weekend I sewed 30 buttons holes and hand sewed on a button for each hole. Safe to say my next make will involve a zip and absolutely no buttons!

Sleeveless Archer Shirt

So, it's winter and quite cold in Melbourne at the moment, but after making my first archer I wanted to try a sleeveless version immediately. And, actually, a sleeveless shirt in winter is quite practical! I've layered it here over a Merino Renfrew top and under a store bought Merino jumper. I wouldn't normally be able to layer over and under my long sleeve shirts as it would all get caught up at the sleeves and drive me crazy rearranging it all day.  Plus, nobody can tell it's not a long-sleeve shirt when I have my jumper on. 

Sleeveless Archer Shirt

The detail's: To make a sleeveless archer I adapted my existing size 6 pattern using Jen's tutorial. As instructed I brought in the shoulder seems by 3/4". I didn't add any darts of remove an ease from the armhole so it is quite large and even a little gapey. This is unfortunate but not really an issue in winter and in summer I'll probably just be glad for the extra breeze.

Sleeveless Archer Shirt

I made the shirt in a White and Navy Gingham and used a larger Red and white Gingham for the contrast. I love that shirt yokes and collars take so little fabric, so you can use up scraps or fabric from no-longer worn garments. The red and white gingham is from a circle skirt I never wore but got second hand because the fabric was lovely. I used white bias binding for the armholes and some red plastic buttons.  

Sleeveless Archer Shirt

The only other changes I made to this shirt were: 1) Sew the front button plackets at a 5/8 seam allowance in stead of a 1/2. This was purely as I was tired and confused. Thank goodness I realised early in the project! 2) Use the burrito method to sew the yoke pieces to the shirt front and back. It's less fiddly than the method provided and I think it provides a cleaner finish.

Sleeveless Archer Shirt

Once again, I think the fit is pretty spot on and I'm super happy with how the shirt looks untucked and tucked in. Below I have the front ends tied in a bow and tucked under which is how I'll wear it in summer with shorts.  I freakin' love the flashes of red! I was tempted to put the red and white yoke on the outside but Tim suggested it looked like I was wearing my shirt inside out. I'm supper happy with the final product and it is more versatile than it would have been with a contracting outside yoke.

Sleeveless Archer Shirt

Second time round the Archer shirt was a dream to sew up. I will definitely sew more in the future and I can't wait to try a pull over variation like this gorgeous chambray version by Kat.

Tuesday, 8 July 2014

Simplicity 1419 Round Trip Dress: The Final Product

Last month I made up a wearable muslin of the Simplicity 1419 Round Trip Dress. The pattern, in a size 12 -grading to a 14 from the waist down, worked out perfectly other than the bodice needing to be shortened. So, I cut into my beautiful Blue Bloom Tessuti Fabrics Japanese Cotton.

Simplicity 1419 Round Trip Dress

For 'the real' version I decided on pattern variation B, which has no collar and short sleeves. Once again I cut a size 12, grading to a 14 from the waist down. The only change I made was to shorten the bodice by 3/8".

Simplicity 1419 Round Trip Dress

The cotton was gorgeous to cut into and to sew. It's quite a wide weave so I did wonder whether I should line or underline the dress but decided against it. The cotton frayed like crazy so I overlocked all the dress pieces before beginning to construct the garment.The fabric is a bit heavier than the lawn and broadcloth I used in my previous version and I really like how the skirt hangs.

Simplicity 1419 Round Trip Dress

There's not to much more to say about this one. The dress came together very quickly having made the 'practice' version. This version was made ever easier without having to fuss over the collar.

Simplicity 1419 Round Trip Dress

I like the fit. The bodice is short enough now and I didn't find the neckline too high, as others have. I haven't decided yet whether I prefer the dress with the sleeves or sleeveless. Unfortunately, I feel a little frumpy in the bold print. Fortunately, I love the dress so much that I'm going to keep on wearing it frumpy or not!

Simplicity 1419 Round Trip Dress
 
Thanks to Jess for taking these shots in our lunch break. Can you tell we are having more windy weather? No complaints though, look at blue sky and sunshine!

Monday, 7 July 2014

Sewaholic Hollyburn Skirt(s)

I bought my Sewaholic Hollyburn skirt pattern in October last year from Indie Stitches. The skirt is a simple design and much loved by the sewing/blogging community.

Sewaholic Hollyburn Skirt

I made up the Hollyburn pretty much straight away in a fabric which I was drawn to in a pop up fabric store. I couldn't decide whether I was drawn to the fabric because I absolutely loved it or hated it. Turns out, I hated it! Off to the opshop this pink, white, and brown flower Hollyburn goes.

Sewaholic Hollyburn Skirt

I finally got the nerve up to try the pattern again with some herringbone woven thick grey wool for a winter skirt. I cut a size 10, version C with added waistband tabs from version B. I made a simple change to the pocket piece: I cut the pocket pieces along the fold line (with added S/A) and cut the facing part in a contrasting pink patterned rayon and the other half out of the shell wool. I sewed these pieces together down the 'fold line' and then treated them as a single piece.  I love the flash of pink in the pockets of an otherwise plain skirt.

Sewaholic Hollyburn Skirt

The construction of the skirt was simple. I overlocked all the edges to finish and inserted an invisible zip instead of a regular. The wool is very thick so I changed two aspects of construction to avoid sewing through multiple thick layers. 1) I hemmed the skirt with pink bias binding so that I didn't have to fold the hem over twice and create excess bulk. 2) I sewed the waistband tabs on to the waistband before folding under the facing. This made it easier going on my sewing machine. I added some pearlescent white buttons to the tabs.

Sewaholic Hollyburn Skirt

I really like how this Hollyburn turned out! It's one of my rare non-patterned makes so it goes with heaps of my wardrobe, while still being a bit special with the flash of pink in the pockets and on the hem. The fit is spot on. I'd usually make a size 8 in Sewaholic patterns but with such a thick wool, and a skirt which only will be worn in winter (I'm talking winter weight here!), I thought the 10 would be a safer option.

Sewaholic Hollyburn Skirt

Here, I'm wearing the Hollyburn with a my white Renfrew top and pink Coppelia Cardigan. I'll be sure to make more hollyburn's in the future. Especially in winter medium weight fabrics. I like the idea of trying the longer variations but don't think they'd suit me. I think my next version might be a lightweight dark denim with belt loops.

Sewaholic Hollyburn Skirt

Friday, 4 July 2014

Draped Coat & Renfrew Top

I've had the Draped Coat pattern from Teach Me Fashion for some time and I finally got inspired to make it up after a trip to Tessuti with the lovely Deanna I picked up 2m of grey medium weight wool/poly blend, which I knew would be perfect for the coat. How did I know this? Well, it was the same colour as the one in the pattern cover photo - aren't I creative?!

Teach Me Fashion Draped Coat

First off, let me state that it was very windy today! My sister, Nat, took these photos and, while I know I could have waited for another day, I have a growing pile of unblogged clothes and I didn't want to add this coat to that pile. In the end we embraced the wind. See below photos  of coat billowing in the wind. 

Teach Me Fashion Draped Coat

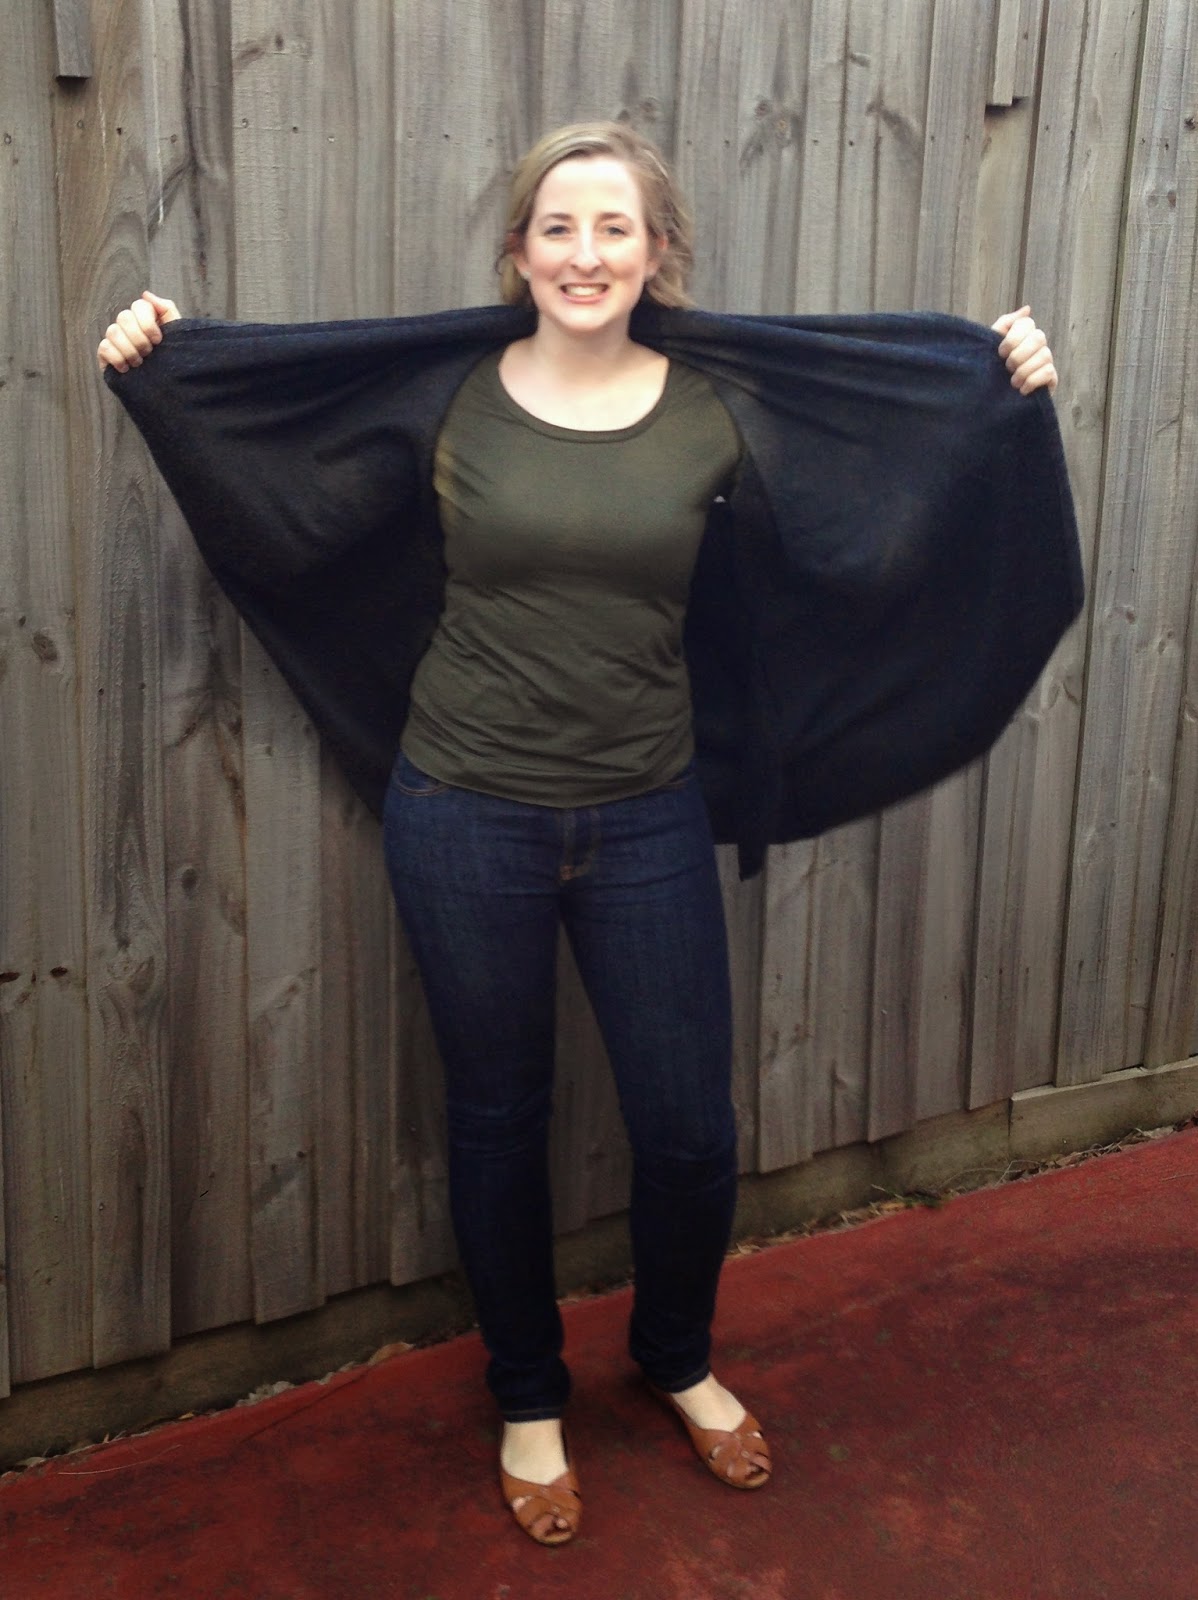
Back to the Coat. This sleeveless shawl collared coat has just three pattern pieces: Front, back, pockets. Given this, and the unfitted nature of the coat it should be no surprise that this is a very simple sew! I whipped up the coat from start to finish in just over 2 hours. This time including cutting out the fabric and watching the pattern YouTube tutorial. Teach Me Fashion Instructions are brief and don't include diagrams, so the YouTube video provides a fantastic a visual guide. 

Teach Me Fashion Draped Coat

The only techniques used in the coat are stitching & finishing the pieces, hemming all around the coat & armholes, and creating one flat fell seam where the two font pieces meet at the centre back collar. Without a doubt this will be the simplest coat you ever make! The project is perfect for beginners.

Teach Me Fashion Draped Coat

I really like the finished product of the coat. I especially love the pockets! The coat is a little different to my usual style though. I generally don't like jackets to finish around my low thighs as I think they accentuate my bottoms/hips. The coat goes so well with jeans but I hardly ever where pants, and the style really wouldn't suit my fit and flare dresses or high waisted skirts. On the other hand. It's super comfortable, looks polished (when the wind stops blowing it around) and goes well over basic long sleeves. I think it would go well with knit pencil skirts, too! I may get more wear out of it then anticipated.
  
Teach Me Fashion Draped Coat

In these photos I'm wearing the coat with an Olive Merino Sewaholic Renfrew Top. It's so satisfying being able to make your own cardy's, t-shirts and other basics. Especially in the cold months! Every winter I go shopping for new long sleeve tops and they get worn so much, and the fabric quality is normally so poor, that by the next winter they need to be replaced. So, I bought the Renfrew Top pattern while the PDF copy was on sale. 

Teach Me Fashion Draped Coat

I was shocked at how many pages it was, but with 3 neckline and 3 sleeve variations I guess I shouldn't have been. Only one suggestion for improvement - the instructions helpfully tell you what pages you should print and put together for different the variations so you don't have to do it all at once. However, unhelpfully, there are no page numbers included on the PDF pages.

Sewaholic Renfree Top

I immediately made 5 versions (two black versions aren't pictured), all size 8, all version A (round neck long sleeves), except for one with 3/4 sleeves. The pattern recommends 1.6m of wide fabric to make version A. I managed to get most of these out of just 1m each. I made 2 from merino (black & olive) and 3 from various weight cottons (a sheer black, white, and a gold/brown). I followed the instructions precisely for the first Renfrew and the pieces came together perfectly. The only change I made was use the overlocker for construction rather than my sewing machine. The next four Renfrews came together in a quick afternoon.

Sewaholic Renfree Top

I think the fit is spot on for comfy layered long sleeves. I love the scoop neck but I will certainly be giving the cowl neckline a go soon. I absolutely adore cuffs and hem bands on knits as it means no hemming, i.e. no use of the sewing machine! However, I've found the extra thickness of the hem band under skirts and dresses a little annoying. I might make a few extra without the hem band by lengthening the bottom and hemming with a twin needle.

Sewaholic Renfree Top

I have more Renfrew's planned as well as some Deer and Doe Plantains. Sewing basics like these has allowed me to begin wearing fully me-made outfits, which  I love, and control the quality of fabric used. My yearly tradition of shopping for long sleeve tops will now be happily exchanged for fabric shopping and sewing.

*Teach Me Fashion generously gifted me the Draped Coat Pattern. Of cours
e, all opinions are my own.*